
Owners manual


WARN INDUSTRIES PAGE 6 83111A0
©2009 Warn Industries, Inc.
WARN® and the WARN logo are trademarks of Warn Industries Inc.
Figure 8
INSTALLATION Continued
Figure 9
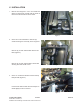
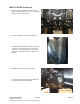
6. Install the lower frame bracket (Figure 8).
Pull the front bumper away from the frame at the
lower attachment so that the lower bracket can
be installed.
This bracket has features on the back that will t
into the frame to locate the bracket.
Secure the lower bracket to the frame with black
3/8”x1-1/4” bolts, clamp plates and 3/8” lock
nuts.
Install the fasteners but leave them a little loose
to allow all fasteners to be installed.
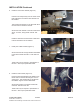
7. Install plow cradle brackets (Figure 9).
Secure both the left and right bracket assemblies
to the lower bracket with 3/8”x1” bolts and lock
nuts.
These bolts may be torqued to specication at
this time. See torque specication table.
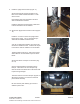
8. Install the back bracket (Figure 10).
Insert the back bracket behind the radiator from
the left side so that the bent ange is close to
cooling fans. This bracket will just t between
the radiator support and front differential.
Secure this bracket to the lower bracket with
5/16”x3/4” bolts and lock nuts.
These bolts may be torqued to specication at
this time. See torque specication table.
Figure 10