
Owners manual

Page 3 63024 B0
WARNING
Drilling operations can cause flying metal chips. WEAR SAFETY GOGGLES.
Flying metal chips can cause eye injury.
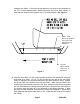
5. Once the side holes are drilled and cleaned, place the rock slider back on the
side of the vehicle. Using the supplied 3/8” black button head bolts, insert the
bolts through the rock slider and the side of the vehicle. Place a 3/8” flat washer,
lock washer and nut on each bolt and torque to 30-36 ft/lbs. Re-tighten the fender
flares if they were loosened.
6. Repeat steps 2-5 for the opposite side of the vehicle.
7. On the inside of the vehicle, pull the carpet up and away from the doorsill on both
sides of the vehicle. Check for any wiring that may be under the carpet and
move it out of the way temporarily. Using a drill and 3/8” bit, drill the three bottom
holes on each side, using the bottom of the rock slider as a guide. Be careful not
to drill into the carpet or any wiring that may be present.
WARNING
Drilling operations can cause flying metal chips. WEAR SAFETY GOGGLES.
Flying metal chips can cause eye injury.
8. Install the supplied spacer tubes between the rock slider and the floor. The four
short spacer tubes are located in the front and rear locations on both sides. The
two long spacer tubes are located in the middle position on both sides. Note:
Due to variations in vehicle manufacturing, in may be necessary to place a
washer on the spacer tube if there is an excessive gap.
9. Using the supplied hardware, insert the 3/8” x 2.25” bolts with a flat washer in the
front and rear locations. Install a 3/8” flat washer and 3/8” nyloc nut on each bolt.
Insert the 3/8” x 3.5” bolts with a flat washer in the middle locations. Install a 3/8”
flat washer and 3/8” nyloc nut on each bolt. It is up to the installer if the bolts
should be going up or down. Torque the 3/8” bolts to 30-36 ft/lbs.
10. Place any moved carpet or wiring back to its original position.