
Owners manual

I. REMOVE EXISTING HUBS
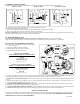
BEFORE INSTALLING WARN HUBS, REMOVE EXISTING HUBS AND RETAIN COMPONENTS AS NOTED
DRIVE FLANGE MANUAL HUBS AUTOMATIC HUBS
Clutch Assembly Clutch (Toyto only) Socket
Drive Flange Retaining Dust Cap Body Gasket Capscrew Hub Body Spacer CapscrewHead
Gasket Ring
(Retain)
(Retain) (Retain) Capscrew
Gasket
Spacer Capscrew
(Retain) & Washer
Snap Ring
Retaining Cap
Hex Nut (Retain) Loc king Ring Assembly
Locking Cone Locking Cone Hex Nut/Bolt Cone
Lockwasher Lockwasher (Retain) Hex Nut (Retain)
Some factory hubs are installed with locking cones, which can be difficult to remove.
Two methods to dislodge the locking cones are:
1) Place a socket slightly larger than the cone against the hub flange and rap sharply with a hammer.
2) Place a brass punch on the end of the stud and rap sharply with a hammer.
TOYOTA TACOMA note: Wheel and tire may need to be removed for hub access, and hub cosmetic cover (if present) needs to be removed
from wheel and discarded before re-installation, to clear Warn hub body.
II. PREPARE WHEEL END
TOYOTA CONVERSION FROM AUTOMATIC TO MANUAL HUBS requires Warn conversion kit P/N 29918.
Verify that wheel bearing adjustment is correct and that the lock nut is tightened to the vehicle manufacturer’s specification.
III. INSTALL WARN HUBS AS FOLLOWS
Note: Warn Hubs are assembled at the factory with the proper
amount of grease.
1. Separate cap assembly from body assembly.
2. Install O-ring and body assembly on wheel end.
3. Install washers and bolts per charts below.
INSTALL FLAT WASHERS,
SPLIT WASHERS & BOLTS/STUDS PROVIDED
NISSAN
Torque to 18-25 ft. lb.
FORD, DODGE, GM
Torque to 27-31 ft. lb.
INSTALL FLAT/SPLIT WASHERS &
ORIGINAL NUTS/BOLTS REMOVED EARLIER
TOYOTA/SUZUKI/GEO
Torque to 18-25 ft. lb.
JEEP, IH
Torque to 27-31 ft. lb.
4. If axle shaft extends beyond the inner drive gear, install retaining ring onto the axle shaft. TOYOTA ONLY (1976-1985): if axle shaft does
not extend beyond the inner drive gear, install stop plug and hex bolt (provided) in axle shaft and torque to 10-12 ft. lb.
5. TOYOTA (86 - Present)/GEO/SUZUKI: If capscrew and spacer were previously removed, reinstall them to the axle shaft and torque to 10-
12 ft. lb.
6. Properly align cap gasket on cap assembly (View 1). Place cap assembly on body assembly. Align guide pin in cap to relief in body (View
2). Install and tighten the socket head cap screws to 45-50 in. lb.
7. TO CHECK FOR PROPER ENGAGEMENT, dial both hubs to LOCK and raise the front left corner of the vehicle off the ground. Spin
the lifted tire. The drive line will turn if the hub is engaging properly.
8. TO CHECK FOR PROPER DISENGAGEMENT, dial the lifted wheel hub into FREE and spin the lifted wheel. If the drive line does not
turn AND and NO ratcheting sound is heard, the hub is disengaging properly. Repeat step 7-8 with the right wheel & hub.
SERVICE INSTRUCTIONS
Service Kits are available at your retail outlet. Hubs should be serviced at the same interval as the wheel bearings. Remove in reverse order of
Installation procedure (III.) Then clean and lightly grease internal working surfaces.
DO NOT PACK THE HUBS WITH GREASE,
THE
HUBS WILL NOT FUNCTION PROPERLY.
P/N 32132 F0