
Instructions / Assembly


26
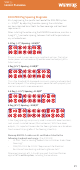
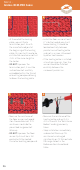
Step 6 -
Install DCM-PRO Cable
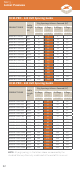
• Measure the resistance of the
heating cable and verify it is
still in line with the “Resistance
Before” reading previously
taken.
• Stop installation immediately
and contact Warmup if its
resistance has changed
significantly or if it falls outside
the range set out in the
Reference Resistance Band
table.
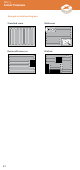
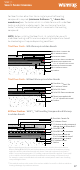
• Install the floor sensor at least
6” into the heated area it will
be controlling. It should be
located centrally between
parallel runs of heating cable
and not in an area influenced
by other heat sources.
• If the heating cable is installed
at multiple spacings, then the
sensor should be installed
centrally between the
narrowest parallel run.
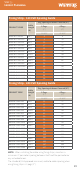
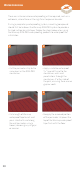
• Measure the resistance of
the floor sensor and record
it on the control card. If it’s
resistance is outside the
prescribed range contact
Warmup.
• DO NOT tape over the floor
sensor tip it must be in full
contact with the heated
thinset or levelling compound.
6
7 8
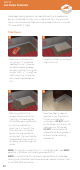
• At the end of the heating
cable, you will find a
termination joint. As with
the manufactured joint at
the beginning of the heating
cable, this joint will have to be
cut into the membrane so that
it sits at the same height as
the heater.
• DO NOT tape over the
termination joint, it must be
in direct contact and fully
embedded within the thinset
or levelling compound being
laid over the heating cable.
5