
Instructions / Assembly

25
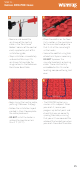
Step 6 -
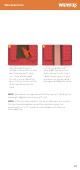
Install DCM-PRO Cable
• Place the coldtail on the floor.
Cut a section in the membrane
for the manufactured joint so
that it sits at the same height
as the heater.
• Secure the cold tail using tabs
of electrical tape as necessary.
DO NOT tape over the
manufactured joint or heating
cable. These must be fully
embedded within thinset or
levelling compound being laid
over.
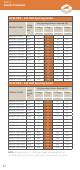
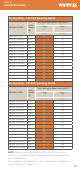
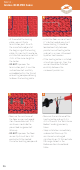
• Measure and record the
resistance of the heating
cable in the “Resistance
Before” column of the control
card, supplied as part of this
installation guide.
• Stop installation immediately
and contact Warmup if its
resistance falls outside the
range set out in the Reference
Resistance Band table.
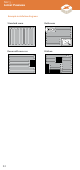
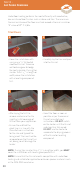
• Begin laying the heating cable,
pressing it between the pegs.
• Follow the installation layout
created in Step 5 to complete
the cable placement.
• DO NOT install the heater in
ambient temperatures less
than 5 °F (-15 °C).
• The DCM-PRO cable has a
marker at its midpoint. When
you reach it, review your
progress up to that point and
check that you are correctly
spacing the cable, ensuring
that you will have covered the
whole of the heated area when
you reach the end of the cable.
1
3 4
2