
Instructions / Assembly


17
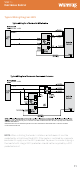
Alternate Installation -
Installing Using Spacing Strips
When using the 12” spacing strips to secure the cable to the
subfloor, use the following provisions to ensure proper spacing of the
cable. The fixing guides included in the kit are 12” long with
1” spacing guides.
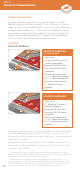
The perimeter spacing strips should be installed a minimum of 3”
away from the wall perpendicular to the planned cable runs.
(Additional stabilizing guides could be laid 40" apart across the floor).
The spacing strips can be secured to the floor using suitable
adhesive, nails, screws or strong double-sided tape.
It may be necessary to cut the guides into smaller sections to
accommodate irregular shaped rooms.
Once you have fitted the spacing strips, the heating cable may be
laid out.
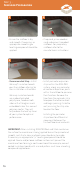
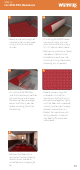
Installing the heating cable
Before you start laying the underfloor heating cable, ensure that the
heating cable(s) are tested. Aer 10 feet of cable has been removed,
you will reach the point at which the unheated lead joins the heating
cable.
The factory made joint should be taped to the floor before and aer
the joint. DO NOT tape over this joint as this may create air pockets
resulting in failure of the joint. Ensure that the factory joint lays flat
on the floor. The joint must be installed under the floor covering and
covered with
3
/
8
”
thinset or self-levelling underlayment from the top of
the floor deck. A channel will need to be made into the floor deck to
accommodate the extra height of the joint. Care should be taken to
ensure that the joint is not bent. Under no circumstances should the
joint or the heated wire be installed within the conduit, only the cold
tail should occupy the UL/cUL certified conduit. Repeat this process
for each heater installed.
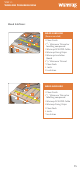
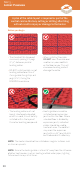
Install the heating cable as per the installation plan. The heating
cable should be laid in parallel lines back and forth across the main
body of the area to be heated. Use the spacing guide in the Layout
Planning page to space the cable. The standard (UL-Approved
minimum) spacing is 3 pegs (3") if using cable fixing strips or 3 pegs
(3 /") if using the DCM-PRO membrane.
Ensure that the cable is held in place by the fixing guides and that
you maintain moderate tension on the cable to prevent it from liing
during the installation of the final floor covering. Using duct tape,
secure the end of the cable to the floor. DO NOT cover the factory end
joint in tape as air pockets may cause the end joint to overheat.