
Installation Guide
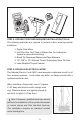
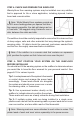
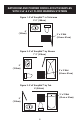

2. If installing a thermostat or control device
that includes a oor sensor, place the sensor
head under the berglass mesh, 6” inside of the
edge and center it precisely in the middle of the
serpentine loop. Once positioned, hold the sensor
in place with hot glue or duct tape to prevent it
from moving during the remaining installation.
Note: The 7-Day Programmable Timer does not use a sensor.
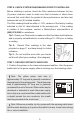
3. Likewise, once the system and power leads are in place, afx each to
the suboor using hot glue or duct tape.
Note: Hot glue will not harm the warming
cable or power leads and may be used to hold
them in place. If using a staple gun, apply staples
through the berglass mesh only. Never staple
near or directly over the warming cable or power
leads.
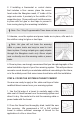
4. Once in place, we strongly recommend that you take photographs of the
actual installation layout of your oor warming system. This will provide an
accurate record should you undertake additional remodeling in the future,
or in the unlikely event that some issue should arise with the installation.
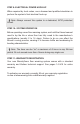
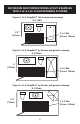
STEP 8: COVER THE SYSTEM IN THINSET CEMENT
You are now ready to apply a thin, skim-coat layer of latex
modied thinset cement over your warming system.
1. Use the at edge of a trowel to carefully apply a thin
skim-coat of thinset cement over the warming system and
allow it to dry. Be careful not to nick the warming cable or
power leads with the trowel.
2. Once the thinset has thoroughly dried, install the new
oor covering. We recommend a 1/4” or 3/8” notched
trowel to assure sufcient coverage of thinset for the
application of a tile or stone oor.
6