
Installation Guide

STEP 6: CHECK SYSTEM OHM READING PRIOR TO INSTALLING
Before installing a system, check the Ohm resistance between the two
(2) power conductor wires to make sure that no breaks or shorts have
occurred that could affect the system’s future performance, and also test
between the two (2) braided sheaths.
The Ohm reading should be within +/- 15% variance of the factory reading
indicated on the UL label attached to the warming mat. If the reading
is outside of this variance, contact a WarmlyYours representative at
(800) 875-5285 for assistance.
Tip 1: Check your Ohm meter to make sure that it contains fresh batteries
and is properly set/calibrated to a scale setting of 0 - 200 prior to taking
a reading.
Tip 2: Record Ohm readings in the chart
provided on page 11 and keep handy for future
reference.
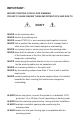
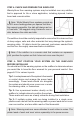
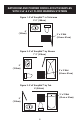
Tip 3: Do not hold the wires with your hands,
as this will affect your readings. (See diagram)
STEP 7: SECURE SYSTEM TO SUBFLOOR
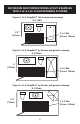
1. Position the system on the clean and prepared suboor. Run the power
leads back to the power supply without crossing over the warming cable.
Note: The yellow power lead wire is
approximately 13’ long and is generally considered
the beginning of the warming mat. The white power
lead is approximately 26’ long and is generally
considered the end of the mat. Either cable may be
shortened or extended to reach the power supply,
but as they are constructed like coaxial cables with
a sheath around the core conductor, the sheath
must be grounded at the control end.
Note: Wherever possible, lay the system with the warming cable down
and the mesh backing up to protect the cable from any trowel nicks during
tile or stone installation.
5