
User guide

Installation and Operation
SECTION 5
5.5.6 Instructions for Installation Under Hardwood Flooring
Note : Although TempZone™ Floor Heating Cable (Twin) is approved for direct contact with combustible material,
WarmlyYours strongly recommends that the cable be embedded in thinset, self-leveling underlayment, cement-
based adhesive glue, or tile adhesive under wood ooring surfaces.
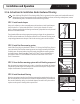
STEP 1: Install wood sleepers
Usingnails,adhesive,orotheracceptablemeansofattachment,installwoodsleepers
(stripsofwood1to2incheswideand3/8to1/2inchhigh)atintervals19inches
apart,ordistancespeciedbytheooringmanufacturer,perpendiculartotheplanned
directionofhardwoodboards.
Theplywoodsuboormustleaveappropriatespacingandgapsforanyplannedruns
ofcabletootherheatedareas.Thesleepersarexedinsuchamannerthattheycreate
arequiredgapbetweentwosleepersinwhichthewarmingsystemcanbeinstalled.
STEP 2: Install the oor warming system
InstallCableFixingStripsasdescribedinsection5.5.1.UsingtheCableFixingStripsto
securethecable,installtheoorwarmingsystemintothegapcreatedbythesleepers.
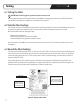
Carefullyreturnthepowerleadstothepowersupplyalongsidethewarmingsystem
andwoodsleepers.AttachPowerMan™andCircuitCheck™tothecoldleadsatthis
time.Refertosection5.3forPowerMan™instructionsandsection5.4forCircuit
Check™instructions.
STEP 3: Cover the oor warming system with self-leveling compound
Afterthewarmingsystemhasbeenputinplace,itshouldbecoveredwithself-leveling
compounduptotheheightofthesleepers.Donotcoverthesleepers.Thetopsofthe
sleepersshouldremainuncoveredandvisible.
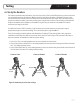
STEP 4: Install hardwood ooring
Allowtheappropriatetimefortheself-levelingcompoundtocompletelydryandcure.
Afterthecompoundhasdriedandcured,installthehardwoodooring.Thehardwood
oorcanbeinstalledbynailingittothewoodsleepers.Becarefulnottoplacenailsor
staplesnearthesystem’sheatingcableorpowerlead.
18