
Full Product Manual

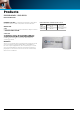


14 PROGRESS PROFILES - PRODESO HEAT SYSTEM
ecessary:
Warning: Be careful not to damage the heating cable with the notched trowel while applying the adhesive to the membrane.
4
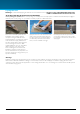
Fix PROBAND 150/250 tape to the same
type of adhesive used for tiling following
the perimeter joint. Inside and outside
corners can be cut from PROBAND
150/250 tape, but pre-cut corners (PRBI
and PRBE) are also available on page 19.
pressure along PROBAND 150/250 to
ensure sealing.
6
Fix PROBAND 150/250 tape to the same
type of adhesive used for tiling following
the perimeter joint.
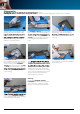
5
Apply the same type of adhesive used for
tiling
4” (100 mm). Particular attention must
Heat membrane and leaving a thin layer
of adhesive on top of the reliefs. Apply
the same type of adhesive used for tiling
to the perimeter wall with a 3/16” x 3/16”
(4 mm x 4 mm ) notched trowel to a
width of about 4” (100 mm).
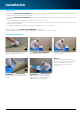
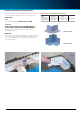
1
Apply the same type of adhesive used
for tiling along the joints between two
trowel, 4” (100 mm) each side of the
the membrane, leaving a thin layer of
adhesive on top of the reliefs.
2
Fix PROBAND 150/250 tape to the same
type of adhesive used for tiling following
and even pressure along PROBAND
150/250 to ensure sealing. Smooth over
to avoiding and eliminate bends and
folds.
3
Apply the the same type of adhesive
used for tiling to the corner (wall and
notched trowel to a width of about 4”
(100 mm).
Warning:
When using PROBAND 150/250,
PROBAND FIX is to be used in the place
of the same type of adhesive used for
tiling for non-cement based substrates.
7
pressure along PROBAND 150/250 to
ensure sealing. Smooth over to avoiding
and eliminate bends and folds.