
Product Brochure
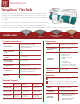

How to Order
• Heating element should be embedded within a
minimum 3/8” thick layer of modified thinset or self-
leveling underlayment
• Heating cable should be installed within 1” to 1.5”
from the top of the flooring surface
• Multiple Flex Rolls can be wired to a control, as
long as they total less than 15 amps (the limit of the
controller).
• Multiple Flex Rolls are never wired to each other in
series (parallel wiring required). The non-heating
leads from each flex roll need to hook up to the
controller and be wired in parallel.
• Do not install under permanent fixtures.
• Do not install within 4” of the toilet wax ring.
• Entire heating section and splices need to be
embedded in thinset or self-leveling underlayment
to prevent overheating and premature failure.
• Do not shorten the warming roll. Do NOT cut the
heating wire. Only the non-heating cold leads can
be shortened.
• Do not run a power lead or sensor wire across a
warming cable.
Installation Information
Simply draw a floor plan sketch of your project
(including dimensions) .
Send it to sales@warmlyyours.com. Then
WarmlyYours’s skilled engineers will create a free
SmartPlan™ custom installation plan based on
your drawing, typically in as little as 1 business
day.
After you receive your SmartPlan™, just verify the
correct dimensions before placing your order
with your WarmlyYours account manager.
• Do not fold or position the warming system so that the
mesh overlaps itself or other warming cables (this could
lead to dangerous overheating).
• Do not connect the warming roll to the power supply for
testing before it is embedded (this could lead to
dangerous overheating). Testing is only done with a
digital ohm meter.
• 120 sq. ft. of heating can be installed on a single 120 V
circuit. 240 sq. ft. of heating can be installed on a single
thermostat operating at 240V.
• TempZone Flex Rolls should be installed with a floor
sensor. All WarmlyYours nSpiration Series thermostats
come with a floor sensor.
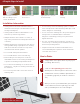
Layout TempZone™ Flex
Rolls according to your
custom SmartPlan™
Secure the Included
Floor Sensor
Apply Thinset or SLC (⁄”
thick minimum)
Install
Flooring
1 2 3 4
1
2
3
Draw a floor plan of
your project and we’ll do the rest!
4 Simple Steps to Install