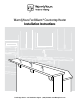
WarmlyYours FeelsWarm® Countertop Heater Installation Instructions Free Design Service • 24/7 Installation Support • (800) 875-5285 • www.WarmlyYours.
Thank you for purchasing a WarmlyYours FeelsWarm® Countertop Heater! Please read the following information to learn how to install and operate your countertop heater. Heater Model: Custom Adhesive-Backed Heater Standard Adhesive-Backed Heater Other Electrical Information (please retain for future reference): Wattage (household) Voltage Approximate current draw (amps) Current draw on household at stated voltage 120V line Serial Number: IMPORTANT: USE ONLY THE POWER TRANSFORMER PROVIDED WITH THIS HEATER.
Before You Begin SECTION 1 Package Contents: • Adhesive-backed heating element • Thermal Control Unit and screws • Transformer (with power cord) • Velcro/strap packet • Hole plug • Peel test strip • Instruction manual Surface Prep Kit • 2 tubes of epoxy (Part A and Part B) • Small brush • Tongue depressor • Mixing tin • Programmable timer (optional) Recommended Tools and Supplies: • Handheld electric drill with 3/4” spade bit (an extended length bit may be needed if running the cabling into a doublewall
Installation Instructions SECTION 2 Read these instructions completely before starting assembly and installation. 1. EVALUATE AND PREPARE THE SURFACE OF THE COUNTERTOP A. Evaluate the lower surface of the countertop to determine if the Surface Prep Kit must be used to create a smooth, uniform surface, which will ensure a secure bond for the heater. Use the peel test strip included in this package to evaluate whether the surface of the stone needs the Surface Prep Coating.
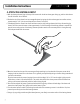
Installation Instructions SECTION 2 Preparation 1. PROTECTIVE EYEGLASSES ARE REQUIRED. 2. Wear gloves and appropriate clothing. 3. Cover surface of the work area and the carpet or flooring under the countertop to protect these areas from drips or spills of the Surface Prep Coating. 4. On the underside of the counter, use a pencil to mark the general outline of where the heater will be attached.
Installation Instructions SECTION 2 2. PERFORM A TEST INSTALLATION OF THE HEATER BEFORE STARTING A. After the surface is prepared, conduct a preliminary fit by leaving the white release liner on the heater and holding the heater under the counter to ensure it fits as expected and that there are no conflicts with supports, doors, or other items. • The front edge of the heater should be mounted between ¼” and ½” from the countertop edge. Precision is not critical.
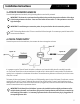
Installation Instructions SECTION 2 3. DRILL CABLE HOLE IN CABINET A. Evaluate how the cable from the heater will reach the outlet inside the cabinet. Consider how the wire will feed and where an access hole needs to be located in order to route the heater cable within the framework of the cabinet. B. Determine where the cable hole can be located to successfully penetrate the cabinet without hitting supports, wires, or other barriers.
Installation Instructions SECTION 2 4. ATTACH THE HEATING ELEMENT A. With the heating element lying on the top of the counter with the white release paper facing up, peel the white release liner off the heater— do not discard. B. Reduce the size of the release liner into manageable pieces by ripping the white release paper into smaller sections, approximately 6” X 24” (the size and shape of these sheets is not critical). C.
Installation Instructions SECTION 2 5. ACTIVATE PERIMETER ADHESIVE Once the heating element is attached, the high-bonding adhesive must be fully activated. IMPORTANT: The heater has a perimeter bonding adhesive that provides the premium adhesion of the edges of the heating element to the stone. Press extra hard within the area within 1” of the perimeter to secure the high-bond edges. IMPORTANT: To avoid damage to connection points, do not press hard on the wire connection pad area.
Installation Instructions SECTION 2 7. SECURE WIRES Your WarmlyYours FeelsWarm® Countertop Heater is supplied with a packet of Velcro patches, a strap, and screws to secure the wires inside the cabinet. Because the length of the wires provided often exceeds what is needed, WarmlyYours recommends securing the wires to keep them out of the way of normal activity. To apply each patch, peel the clear release liner off one half of the Velcro patch and stick it onto the cabinet wall.
Installation Instructions SECTION 2 9. INSTALL CABLE PLUG A round cable plug is included with your heater. Using the slit in the side of the plug, place the plug over cable wire, then insert the plug into the hole in the cabinet. See drawing on page 6. 10. OPTIONAL TIMER To make operation easier and enhance your experience using your WarmlyYours FeelsWarm® Countertop Heater, WarmlyYours offers an optional 7-day programmable timer, allowing you to program 14 events or 2 ON-OFF cycles per day.