
Installation Guide


14
buywarmall.com
Hot Glue
8 ft
9 ft²
3 ft²
10 ft²
12 ft
Thermostat
3”
2”
3”
16”
16”
²
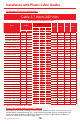
Installation with Plastic Cable Guides
Dene the area of the oor to be heated where there is no xed furniture (such as a shower,
toilet, cupboard or washbasin, etc.) and calculate the area to be heated.
Example of cable installation on the oor
Total area 96 sq. ft. minus 22 sq. ft. of xed furniture space equal heated area 74 sq. ft.
Using the specications and the calculation of the total area to be heated, you can choose
the desired heated cable size. Dene the optimal layout of the oor to be heated using
the table below. WarmAll (www.BuyWarmAll.com) to ensure adequate coverage. Choose a
location to place the thermostat on a wall above the heated zone, where it can be reached
by a 10 foot cold lead wire and the oor temperature sensor lead wire.
lt is recommended to leave a minimum of 3 inches between the wall and the rst heating
cable.
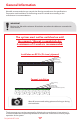
Cable installation
After performing the rst resistance and insulation tests, conrm that the cable has no
faults. Write the results in the Test Log sheet. Place the cable so that the connection point
and the temperature probe are at the expected starting layout position.
Bring the power cable to the thermostat or junction box.
Begin the installation of the heating cable according to the layout developed using the
templates approved.