Installation Guide 3.7W heating cable for floor heating system with cable guides or for uncoupling membrane 1 855 396 5600 • buywarmall.com • info@buywarmall.com buywarmall.
General information This guide explains how to install the 3.7CWC & the 3,7GCWC cables with an uncoupling membrane or plastic cable guides (how to prepare the installation and install the cable in the membrane or the cable guides). lt is important to read and understand this guide, the thermostat guide, Warranty and Test log sheet before installing. For more information, contact Warrmall. IMPORTANT: R C US This cable is CSA certified for Canada and the United States.
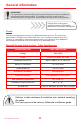
General information 25-year limited Cable Warranty and 2 years on thermostat WarmAll warrants the heating cable for a period of 25 years and the thermostats (Mysa, Warmup and OJ Electronics) for a period of 2 years.
General information IMPORTANT: lt is important to contact the floor covering manufacturer to meet its installation requirements with heating cables. The installer must also comply with the recommendations of any product installed below and above the heating cables. Flexible floor coverings are prohibited with the Uncoupling Membranes. Use plastic cable guides. Circuit This floor heating system must be on a dedicated electrical circuit. The load of our thermostats is 15 amperes on 120 or 240 volts.
General information Preparing the subfloor Clean the subfloor thoroughly. Ensure that there are no nails, screws or any other elements which can damage the heating cable when laid on the floor. Verify that the subfloor structure meets the required standards if using plastic cable guides or an Uncoupling Membrane. The surface must meet all construction standards relevant to the coating and the use of a floor heating system. Check with the manufacturer for compliance with a floor heating system.
Floor sensor installation Planning the installation The design of the installation must correspond to the requirements of the installation guide. The cables are available in 120 and 240 volts. They cannot be interchanged. Determine the location of the thermostat on the wall. The thermostat must be accessible, in the room where the cable will be installed and it must be installed at the legal height required by the laws in force in your area.
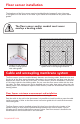
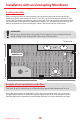
Floor sensor installation The head part of the floor sensor must be installed directly between 2 wires. Use tape or hot glue to fix the sensor on the floor if your cables are installed with our plastic cable guides. The floor sensor and/or conduit must never overlap a heating cable A. Location of the probe in the floor heating system with cable guides B.
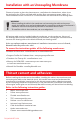
Installation with an Uncoupling Membrane Choose a location to place the thermostat on a wall above the heated zone, where it can be reached by the 10 feet cold lead cable and the floor temperature sensor cables. lt is recommended to leave a minimum of 3 inches between the wall and the first heating cable.
Installation with an Uncoupling Membrane - All heating cable, including the connection connecting the heating cable to the nonheating cable must be installed in the membrane and covered with thinset cement; - The cable must not be installed under furniture attached to the floor where air cannot circulate: toilet, washbasin, vanity, wardrobe, bath, shower, etc.
Installation with an Uncoupling Membrane lnstalling the cable After carrying out the first cable resistance and insulation tests and confirming that the reading are good, (note: write the results in the Test Log Sheet) install the connection part of the cable (connecting the heating part to the black non-heating cable) in accordance with the instructions of the membrane manufacturer and run the non-heating cable through the wall to the thermostat. Start installing the cable in the membrane per instructions.
Installation with an Uncoupling Membrane lnstallation/Technical information Cable 3.7 Watts 120 Volts Cable without magnetic field for uncoupling membrane Model WARMUP / DITRA-HEAT / PROVA-HEAT / LATICRETE DREXMAT PRODESO HEAT / MAPEI / NUHEAT Spacing (ft2) Spacing (ft2) Length 2 & 3 Slots Ft. M 3 Slots 3 & 4 Slots 4 Slots 2 & 3 Slots 3 Slots 3 & 4 Slots 4 Slots 3.03" 3.63" 4.24" 4.84" 3.12" 3.74" 4.36" 4.99" 14.7 W 12.2 W 10.5 W 9.2 W 14.2 W 11.9 W 10.2 W 8.
Installation with an Uncoupling Membrane lnstallation/Technical information Cable 3.7 Watts 240 Volts Cable without magnetic field for uncoupling membrane Model WARMUP / DITRA-HEAT / PROVA-HEAT / LATICRETE DREXMAT-TW PRODESO HEAT / MAPEI / NUHEAT Spacing (ft2) Spacing (ft2) Length 2 & 3 Slots Ft. M 3 Slots 3 & 4 Slots 4 Slots 2 & 3 Slots 3 Slots 3 & 4 Slots 4 Slots 3.03" 3.63" 4.24" 4.84" 3.12" 3.74" 4.36" 4.99" 14.7 W 12.2 W 10.5 W 9.2 W 14.2 W 11.9 W 10.2 W 8.
Installation with Plastic Cable Guides IMPORTANT Initial cable and sub-floor verification procedures are outlined on page 17 to page 20. Read and understand them carefully before installing. If you have any questions, please contact WarmAll. Installation with Plastic Cable Guides Instructions Attach the cable guides to the subfloor, perpendicularly to the direction of the cables, with screws hot glue, staples, nails or double-sided adhesive tape.
Installation with Plastic Cable Guides Define the area of the floor to be heated where there is no fixed furniture (such as a shower, toilet, cupboard or washbasin, etc.) and calculate the area to be heated. Hot Glue Thermostat 10 ft² ² 8 ft 16” 16” 2” 9 ft² 3” 3” 3 ft² 12 ft Example of cable installation on the floor Total area 96 sq. ft. minus 22 sq. ft. of fixed furniture space equal heated area 74 sq. ft.
Installation with Plastic Cable Guides IMPORTANT Do not cut or shorten the cable. Do not expose it to mechanical stress. Avoid walking on the heating cable. Wear shoes with soft soles. lnstallation/Technical information Cable 3.7 Watts 120 Volts Cable without magnetic field Spacing (ft2) Length Model 3" 4" 5" 14.8 W 11.1 W 8.9 W Watt Amp Ohms Guides Ft. M 3,7GCWC-120V-05 16.5 5.05 4.1 5.5 6.9 60 0.5 240.0 10 3,7GCWC-120V-10 33.0 10.1 8.3 11.0 13.8 120 1.0 120.
Installation with Plastic Cable Guides lnstallation/Technical information Cable 3.7 Watts 240 Volts Cable without magnetic field Spacing (ft2) Length Model Ft. M 3" 4" 5" 14.8 W 11.1 W 8.9 W Watt Amp Ohms Guides 10 3.7GCWC-240V-10 33.0 10.1 8.3 11.0 13.8 120 0.5 480.0 3.7GCWC-240V-14 49.5 15.1 12.4 16.5 20.6 180 0.8 320.0 15 3.7GCWC-240V-19 66.0 20.2 16.5 22.0 27.5 240 1.0 240.0 20 20 3.7GCWC-240V-24 82.5 25.1 20.6 27.5 34.4 300 1.3 192.0 3.
General Information WarmAll recommends that you consult the flooring manufacturer for specifications. Preparation and installation of the flooring must be carried out according to the manufacturer’s recommendations. IMPORTANT Perform the 3rd cable resistance & insulation test when the cables are covered with fresh cement. The system must not be switched on until the cement / thinset is completely dry. A minimum of 4 weeks is recommended.
Connection to the electrical network You must write the appropriate information on the breaker in the electrical panel. Please identify with a label (Room ID, #) the selected breaker feeding the heating cable. Perform a 4th cable resistance & insulation test. Write the results in the Test log Sheet.
Check cable integrity when to test? 1) When receiving the cable; 2) After laying the cable in the membrane or subfloor with our plastic cable guides and before covering the the cable with cement; 3) After covering the cable with cement and before laying the floor covering; 4) After the installation of the floor covering and before connecting the heating cable to the thermostat. Enter all test results on the warranty log.
Heating Cable lnsulation Resistance Test This test measures the resistance of the Cable and is used to determine circuit integrity. Set your multimeter to the 200 or 2000 ohms range (see image A). On 120V, connect the multimeter leads to the black and the white cold lead wires. On 240V, connect the multimeter leads to the black and the red cold lead wires. Compare this resistance reading to the resistance specified in the Product Selection or cable tag. The value should be within ±10%.
Notes buywarmall.
Notes buywarmall.
Notes buywarmall.
1 855 396 5600 • buywarmall.com • info@buywarmall.