
Operating Instructions


-30-
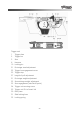
8. Slide locking lever
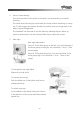
Re-adjustment of the slide locking lever
The slide locking lever firmly connects the frame
with the slide casing. If the clamping strength
weakens, re-adjust the slide locking lever as shown
in the illustration. Turn the slide locking lever (2)
forward. Remove the screw (1) and lift the locking
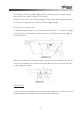
spring (5) off and out. Turn the slide locking lever
out by about 2 turns (see ill. a) while holding the
nut (3) on the opposite side firmly in position
(ill. b). Push the slide locking lever (2) against the
pistol. This causes the nut (3) to be pushed clear
of the locking pin (4) (ill. c) so that the nut (3) can
now be adjusted (ill. b and c). To increase the
tension, turn the nut clockwise; to decrease it, turn it anti-clockwise. Push the nut
(3) in again and turn the slide locking lever (2) back into the locked position. A cer-
tain amount of gripping pressure must be perceptible while the lever is being
pushed home through the final portion of its travel (ill. d). Check to ensure that
the slide casing sits firmly on the frame, then replace screw (1) and spring (5).