
Operating Instructions


-28-
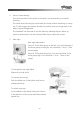
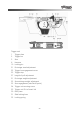
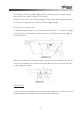
Trigger shoe position
The trigger shoe (1) may be adjusted for length of pull and angle by loosening
screw (27). To switch from right-handed to left-handed shooting, turn the trig-
ger shoe (1) through 180 degrees.
Setting the trigger stop (after-travel)
Cock the hammer (6). Turn screw (23) clockwise until the hammer (6) can no
longer be released. Hold the hammer down, press the trigger shoe, and simul-
taneously turn screw (23) anti-clockwise slowly until you feel the hammer disen-
gage. To obtain the desired after-travel, turn screw (23) a further quarter or half
turn anti-clockwise.
Setting the first-stage trigger weight
By turning screw (31) clockwise, you can increase the first-stage trigger weight
up to the total let-off weight. By turning screw (31) anti-clockwise, you can re-
duce it. After making an adjustment, check the play between the trigger bar (3)
and the sear (5), and adjust if necessary following the instructions in “Basic Set-
ting”.
Setting the second-stage trigger weight
Turn screw (32) clockwise to increase the second-stage trigger weight and anti-
clockwise to reduce it.
Setting the second stage
Turn screw (33) anti-clockwise to increase the sear engagement (more trigger
creep). Turn screw (33) clockwise to reduce the sear engagement (crisp trigger
action).
CAUTION! Do not withdraw screw (33) too far! If you do so, screw (33) no
longer locates in the slot in the plunger of screw (32). To relocate it, remove
screw (32) with spring and plunger, and reassemble.
Setting the trigger weight
The total trigger weight is the sum of the first- and second-stage weights. Shoot-
ing lay down that the total weight must be at least 1000 grams or 1360 grams.