
Operating Instructions

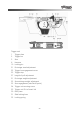


-27-
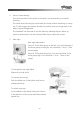
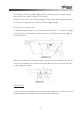
Inserting the trigger unit into the frame
The locking pin (10) must be in the ‘locked’ position and the barrel and slide re-
moved. Place the filler piece (50) in the bottom of the frame. Insert the trigger
unit into the frame so that the radiused cut at the bottom of the forward edge
locates onto the locking pin (10). Then lower the back of the trigger unit into
the frame. Take up any slack in the fit by gently turning the Allen screw (34)
clockwise until the trigger unit ‘fit to frame’ nib (35) clamps the unit to the
frame without any movement. Then cock the hammer.
Replace the barrel and slide onto the frame and push fully backwards. Then turn
the slide locking lever (51) fully home to the rear, ensuring that it is locked by
the locking spring (52).
If, after test firing, you feel the trigger needs fine tuning, proceed as follows.
Removing the trigger unit from the frame
Press the locking spring (52) and turn the slide locking lever 180 degrees anti-
clockwise. Hold the pistol in the firing position and push the barrel/slide assem-
bly forward with the thumb of your firing hand.
Take the barrel/slide assembly from the frame. Turn the Allen screw (34) half a
turn anti-clockwise and uncock the hammer while holding it back (do not let the
hammer fall without a stop) . Rotate the trigger unit round the locking bolt (10)
and remove it from the frame.
Basic setting
Cock the hammer (6). If it does not engage, turn screw (21) anti-clockwise until
the hammer engages. Now, while holding the hammer back, slowly turn screw
(21) clockwise until the hammer is released, then turn it anti-clockwise two
turns. Cock the hammer (6). Then turn screw (22) anti-clockwise until there is
play between the trigger bar (3) and sear (5). Reduce the play between (3) and
(5) by turning screw (22) clockwise. If you cock the hammer with the trigger (1)
pulled and allow the trigger to move slowly forward, the trigger bar should au-
dibly engage with the sear.