
Product Manual
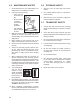

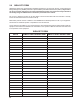
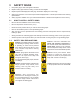
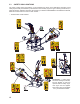
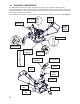
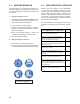
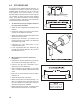
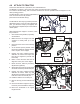
Table Of Contents
- DELIVERY INSPECTION REPORT
- label information
- SERIAL NUMBER LOCATION
- 1 INTRODUCTION
- 2 SAFETY
- 3 SAFETY SIGNS
- 4 OPERATION
- 5 TRANSPORTING
- 6 STORAGE
- 7 SERVICE AND MAINTENANCE
- 8 TROUBLE SHOOTING
- 9 SPECIFICATIONS

20
This section describes the 3 point hitch, PTO and attachments.
The BX52S is a category I & II 3 point hitch and is quick hitch & imatch compatible.
For maximum life and safety, PTO connection should be as level as possible when the chipper is in the
down (working) position.
The BX features a lower ski that is adjustable by 6.0". Ski adjustment may be required to help make the
PTO connection as level as possible.
(See Section 4.8 Machine Setup).
Lower Link
Arms
Top Link
Arm
Install
Retainers
Lower Link
Pins
Top Link
Point
The BX feature clevis style (3 position) lower link
attachment points. To use the centre attachment
point, you will need a 7/8 pin (not supplied). Use
the existing bolt in implement pin for the inside or
outside points.
When attaching the chipper to a tractor, follow
this procedure:
4.6 ATTACH TO TRACTOR
1. Clear the area of bystanders, especially
small children.
2. Make sure there is enough room and
clearance to safely back up to the
chipper.
3. Place the tractor arms in their full sway
position.
4. At the slowest speed possible, back
the tractor towards the chipper with the
tractor “square” to the chipper.
5. Engage the tractor park/lock brake,
dismount the tractor and inspect the
link and pin alignment (vertical and
horizontal).
6. Raise or lower the lower link arms to
align them to the pins on the chipper.
7. Return to tractor, make any necessary
adjustments (up/down)
8. Slowly back up the tractor until the lower
arm holes are lined up with the link pins.
9. Engage the tractor park/lock brake,
dismount the tractor, make any nal
adjustments, and slide the left and right
lower arm holes onto the link pins.
10. Install the retainers on the link pins.
11. Remove the top pin and install the top
link.
12. Use the turnbuckle to align the top link.
Insert the pins and install the retainers.
13. Return the turnbuckle to its original
length and lock.
Clevis Style
Lower Link
Centre Attach
Point