
Install Manual
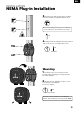

15
EN
INSTALLATION
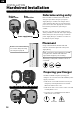
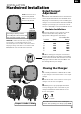
Hardwired Installation
Closing the Charger
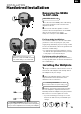
Torque: 13.3in·lbs (1.5N·m)
Rated Current
Adjustment
4
2
6
24A
16A
40A
30A
20A
50A
Position Amps
Circuit Breaker
Rating
5
3
7
32A
20A
48A
40A
25A
60A
1
2
3
4
5
6
7
8
9
0
40A-versions are set to
Position 6 by default
48A-versions are set to
Position 7 by default
ø T20
5 x 10mm
Selecting a switch position
exceeding the rated current will
not exceed the rated current.
Current
selector
1. Both the 40A and 48A versions of Pulsar Plus
can be adjusted from 16A to the maximum rated
amperage of each model. If you are installing your
charger on a circuit rated lower than the maximum
rating for your charger, you can use the current
selector to manually set a lower maximum current.
2. On your charger cover, locate the current
selector and set the rotary switch to the
appropriate setting per the chart below.
3. When setting your charger’s current lower
than the max.rating, use the label corresponding
to your selected current value from the enclosed
amperage reduction label sheet and aix it over
the existing label on your charger.
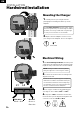
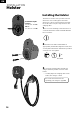
Hardwire Installations
CAUTION To reduce the risk of fire, only connect
your charger to a circuit with a branch circuit
overcurrent protection of 125% of the selected max
amperage setting of the device in accordance with
ANSI/NFPA 70 (US) C22.2 NO 280 13 (Canada)
1. Carefully reattach the communications cable
to your charger cover and close the cover of your
charger.
2. Insert the four corner screws to secure your
charger cover. Do not over-tighten.
3. Making sure to properly align the bottom
screw opening, place the cover frame on your
charger and attach the frame with the screw.
Do not over-tighten.
Proceed to the instructions for installing the
holster and operating your charger, pages 16-17
PULSAR PLUS
Amperage Reduction Label
Input/Output:
208/240VAC, 60Hz, 16A
Input/Output:
208/240VAC, 60Hz, 20A
Input/Output:
208/240VAC, 60Hz, 24A
Input/Output:
208/240VAC, 60Hz, 32A
Input/Output:
208/240VAC, 60Hz, 40A
Save this label sheet for future use.
Product label Circuit Breaker
Place the appropriate Input/Output
label on top of the charger’s label.
Label the breaker with the selected amperage value.
EV Charger
20A
TM
EV Charger
20A
TM
EV Charger
25A
TM
EV Charger
25A
TM
EV Charger
30A
TM
EV Charger
30A
TM
EV Charger
40A
TM
EV Charger
40A
TM
EV Charger
50A
TM
EV Charger
50A
TM
EV Charger
20A
TM
Wallbox Chargers S.L.
Enclosure Type 3R
PN: PUP1-U-1-5-N-002-A
22ºF to 104ºF (-30ºC to 40ºC)
08/2020Made in SpainSN: 123456 UID: abcdefgh
Input/Output:
208/240VAC, 60Hz, 48A