ENG Operating Manual Light Control PULSE HFMD PULSE PIR Version IV
ENG Operating Manual Light Control „PULSE HFMD / PULSE PIR - Vers. IV“ Dear customer, Operating units 3 General 4 - Safety instructions 4 The operating instructions give information on additional setting options on lights equipped with the PULSE HFMD or PULSE PIR control of version IV. The functions described here go beyond the general operating options on the light and are usually rarely required.
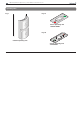
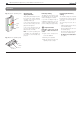
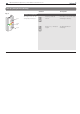
ENG Operating Manual Light Control „PULSE HFMD / PULSE PIR - Vers. IV“ Operating units Fig. 1 Fig. 2a Sensor operating unit "PULSE HFMD" Fig.
ENG Operating Manual Light Control „PULSE HFMD / PULSE PIR - Vers. IV“ General information Validity of these instructions These instructions apply to the following lights: - Lights equipped with Pulse HFMD from firmware vers. VFP 04.5 l - Lights equipped with PULSE PIR from firmware vers. VFS 04.
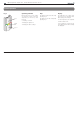
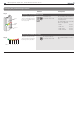
ENG Operating Manual Light Control „PULSE HFMD / PULSE PIR - Vers. IV“ Operation Fig. 3 (column operating unit) Operating and display elements Key I All operating and setting functions be set from the column operating unit [Fig. 3] or from the sensor operating unit [Fig. 4]. Light bar In the column operating unit, the functions and settings are displayed via the light bar. Key II Fig. 4 (sensor operating unit) In the sensor operating unit, all functions and settings are displayed via the two LEDs.
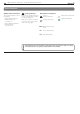
ENG Operating Manual Light Control „PULSE HFMD / PULSE PIR - Vers. IV“ General operation Fig. 3 Key I Operating elements Keys Display By pressing keys I and II, different functions can be executed, depending on which key was pressed: The light is switched on and off by pressing key II. The light bar in the column operating unit is only activated when basic settings are changed.
ENG Operating Manual Light Control „PULSE HFMD / PULSE PIR - Vers.
ENG Operating Manual Light Control „PULSE HFMD / PULSE PIR - Vers. IV“ Switching On/Off Actuation Fig. 3 Consequence Switching on Key I Light bar The light is switched on by pressing key II. Note: The light can also be switched on by pressing key I. Press key II The light is switched on to the light level set last. Press key II The light is switched off. 1x Key II Switching off The light is switched off by pressing key II. 1x 8 The light level set last is saved automatically.
ENG Operating Manual Light Control „PULSE HFMD / PULSE PIR - Vers. IV“ Changing the light level (dimming) Actuation Fig. 3 Consequence Setting a new light level Key I Light bar Key II The light level can be changed by pressing key I. Press key I and hold it down. After about 1 second, the light will change its intensity. Release key I and press it again. The dimming direction will change.
ENG Operating Manual Light Control „PULSE HFMD / PULSE PIR - Vers. IV“ Changing the parameterising functions Actuation Fig. 3 Consequence Switching to the parameterisation mode The parameterisation mode can be loaded by pressing both keys simultaneously for 10 seconds. Key I Press both keys for at least 10 seconds The operating unit switches to the parameterisation mode (first to setting level 1).
ENG Operating Manual Light Control „PULSE HFMD / PULSE PIR - Vers. IV“ Changing the parameterising functions (Continued) Actuation Fig. 3 Consequence Changing the setting level The setting level can be loaded by pressing both keys simultaneously for 10 seconds. Key I nx Press both keys for 5 seconds each as often as necessary for reaching the desired setting level. Light bar Release both keys Fig. 6 2 3 4 5 Level 3 has been reached when LEDs 1 to 3 are lit on the light bar.
ENG Operating Manual Light Control „PULSE HFMD / PULSE PIR - Vers. IV“ Changing the parameterising functions (Continued) Actuation Fig. 3 Changing the function The desired function can be loaded by pressing key II. Key I nx Light bar Key II Fig. 6 LED 1 12 Consequence 2 3 4 5 6 Press key II as often as necessary for reaching the desired function. The LED valid for the function will be lit or flash on the light bar: LED 1 Function x.1 LED 2 Function x.2 LED 3 Function x.
ENG Operating Manual Light Control „PULSE HFMD / PULSE PIR - Vers. IV“ Changing the parameterising functions (Continued) Actuation Fig. 3 Consequence Changing the setting The function can be toggled between active and inactive by pressing key I. Key I nx Press key I as often as necessary for reaching the desired setting.
ENG Operating Manual Light Control „PULSE HFMD / PULSE PIR - Vers. IV“ List of the parameterising functions Fig. 3 The following functions can be selected: The bold-printed values are the in-factory defaults Key I Light bar Key II Fig. 6 LED 1 2 3 4 5 6 Level Function Light bar (Fig. 6) Designation 1 Funct. 1.1: LED 1 (dark green) Light bar ON/OFF 1 Funct. 1.2: LED 2 (light green) External switching ON/OFF 1 Funct. 1.3: LED 3 (yellow) Burn-In function ON/OFF 1 Funct. 1.
ENG Operating Manual Light Control „PULSE HFMD / PULSE PIR - Vers. IV“ Changing the parameterising functions (Example) Actuation Example How to load and change the function x.y is shown using the function 2.5 "Continuous mode" as an example.
ENG Operating Manual Light Control „PULSE HFMD / PULSE PIR - Vers. IV“ Setting function 1.1 Actuation Light bar Function for switching the light bar on and off. Loading the parameterisation mode Press both keys for at least 10 seconds By default, the function is set to “ON”. The light bar is on. When the function is changed, the light bar remains switched off in normal operation.
ENG Operating Manual Light Control „PULSE HFMD / PULSE PIR - Vers. IV“ Setting function 1.2 Actuation External switching Function for operating the light via external switching elements. By default, the function is set to "OFF". When power is supplied from an external source, the light remains switched off. When the function is on, the light will switch to the level set last as soon as the power supply is connected (e.g. via a switched socket).
ENG Operating Manual Light Control „PULSE HFMD / PULSE PIR - Vers. IV“ Setting function 1.3 Actuation Burn-in function Function for burning in the lamps By default, the function is set ex works to "OFF".
ENG Operating Manual Light Control „PULSE HFMD / PULSE PIR - Vers. IV“ Setting function 1.4 Actuation Write protection Function for allowing or preventing setting changes. By default, the function is set to "OFF", i.e., set levels can always be overwritten. The levels cannot be changed if the write protection is active.
ENG Operating Manual Light Control „PULSE HFMD / PULSE PIR - Vers. IV“ Setting function 1.5 Actuation Light control Function for the automatic readjustment of the set brightness in case the ambient brightness changes. By default, the function is set to "ON", i.e., the light control is functioning. Display Loading the parameterisation mode Press both keys for at least 10 seconds Loading setting level 1 If the light control is off, the light functions as a dimmable light.
ENG Operating Manual Light Control „PULSE HFMD / PULSE PIR - Vers. IV“ Setting function 1.6 Actuation Presence control Function for detecting the presence of persons. By default, the function is set to "ON", i.e., the presence control is functioning. When the function is on, the light will be automatically switched off when no presence is detected over a certain period of time. If the presence control is switched off, the light functions as a light with light control or as a dimmable light.
ENG Operating Manual Light Control „PULSE HFMD / PULSE PIR - Vers. IV“ Setting function 1.7 Actuation Demo mode Function for demonstration and for testing the light functions. By default, the function is set to "OFF", i.e., the demo mode is not functioning. When the demo mode is on, all control times are effective within seconds. Note: This mode is left automatically 10 minutes after the last key press.
ENG Operating Manual Light Control „PULSE HFMD / PULSE PIR - Vers.
ENG Operating Manual Light Control „PULSE HFMD / PULSE PIR - Vers. IV“ Setting function 2.1 Actuation Sensitivity high Function for changing the sensitivity of the presence control. By default, the function is set to "ON", i.e., the presence has its normal sensitivity (100%). Small movements are also detected within the detection range of the sensor. When the function is set to "OFF", the presence sensor works with reduced sensitivity (approx. 50%).
ENG Operating Manual Light Control „PULSE HFMD / PULSE PIR - Vers. IV“ Setting function 2.2 Actuation Automatic switch-on Function for allowing or suppressing automatic switch-on when light is insufficient or in case of presence (semi-automatic). By default, the function is set to "ON", i.e., the light is automatically switched on in case of presence or when light is insufficient. When automatic switch-on is off, the light has to be switched on manually even in case of presence.
ENG Operating Manual Light Control „PULSE HFMD / PULSE PIR - Vers. IV“ Setting function 2.3 Actuation Special function The special function cannot be used. Display Loading the parameterisation mode Press both keys for at least 10 seconds The function cannot be changed. Light bar LED 1 (dark green) Parameterisation mode ON Loading setting level 2 Press both keys again for 5 seconds Function 2.3 Light bar LEDs 1+2 Level 2 Special function Press key II twice Light bar LED 3 (yellow) Function 2.
ENG Operating Manual Light Control „PULSE HFMD / PULSE PIR - Vers. IV“ Setting function 2.4 Actuation Sensor LED Function for switching both LEDs in the operating unit sensor on and off (see Fig. 4). By default, the function is set to "OFF", i.e., the LEDs in the light head are off. Loading the parameterisation mode Press both keys for at least 10 seconds Press both keys again for 5 seconds Function 2.
ENG Operating Manual Light Control „PULSE HFMD / PULSE PIR - Vers. IV“ Setting function 2.5 Actuation Continuous operation Function for setting the light to continuous mode. Loading the parameterisation mode Press both keys for at least 10 seconds By default, the function is set to "OFF". When the function is switched on, the light will work in continuous mode. Even if no presence is detected, the light will be lit at the lowest level.
ENG Operating Manual Light Control „PULSE HFMD / PULSE PIR - Vers. IV“ Setting function 2.6 Actuation Parameter setting protection Function for activating the parameter setting protection (required for final inspection) By default, the function is set to "OFF". When the function is switched on, a factory reset will not overwrite the set parameters. The parameter setting of the electronic ballast units will be carried out.
ENG Operating Manual Light Control „PULSE HFMD / PULSE PIR - Vers. IV“ Setting function 2.7 Actuation Special function The special function cannot be used. Display Loading the parameterisation mode Press both keys for at least 10 seconds The function cannot be changed. Light bar LED 1 (dark green) Parameterisation mode ON Loading setting level 2 Press both keys again for 5 seconds Function 2.7 Light bar LEDs 1+2 Level 2 Special function Press key II 6 times Light bar LEDs 5+6 Function 2.
ENG Operating Manual Light Control „PULSE HFMD / PULSE PIR - Vers.
ENG Operating Manual Light Control „PULSE HFMD / PULSE PIR - Vers. IV“ Setting functions 3.1 to 3.6 Actuation Follow-up time Function for setting the time after which the light is to be switched off if no presence is detected. By default, the follow-up time is set to 10 min. 6 different follow-up times from 5 to 30 min can be set.
ENG Operating Manual Light Control „PULSE HFMD / PULSE PIR - Vers. IV“ Setting functions 3.1 to 3.6 (Continued) Actuation Follow-up time (Continued) Display Changing the function - Increasing the follow-up time step-by-step nx Press key I as often as necessary for reaching the desired value Light bar LEDs 1-6 some are flashing Follow-up time level 3 (15 min) 5 min 10 min 15 min 20 min 25 min 30 min Each LED that is not flashing stands for a follow-up time of 5 min.
ENG Operating Manual Light Control „PULSE HFMD / PULSE PIR - Vers. IV“ Setting functions 4.1 to 4.6 Actuation Presence range Function for setting the detection range of the presence sensor. Loading the parameterisation mode Press both keys for at least 10 seconds By default, the range for the presence sensor is set to 80%. 6 different levels from 10% to 100% can be set.
ENG Operating Manual Light Control „PULSE HFMD / PULSE PIR - Vers. IV“ Setting functions 4.1 to 4.
Order No. 405 262 110 - © copyright H.Waldmann GmbH & Co. KG - nB/04/2011 - TB - Subject to change - Printed in Germany ENG 36 Operating Manual Light Control „PULSE HFMD / PULSE PIR - Vers.