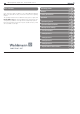
ENG Operating Manual Light Control PULSE HFMD Vers.
ENG Operating Manual Light Control „PULSE HFMD - Vers. IV“ Dear customer, these instructions apply in addition to the Lights Operating Manual. Observe in particular the safety instructions stated in the operating manual! The operating manual informs of additional setting options on lights with PULSE HFMD control. The here described functions go beyond the general operation possibilities on the light and are usually rarely required.
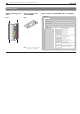
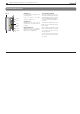
ENG Operating Manual Light Control „PULSE HFMD - Vers. IV“ Operating panels Column operating panel “MFT” Sensor operating unit “PULSE HFMD” Fig. 1 Fig. 2 Menu structure “PULSE HFMD - Vers. IV with MFT” Functions ON/OFF Change light level Change light level Note: The functions written in blue are not available.
ENG Operating Manual Light Control „PULSE HFMD - Vers. IV“ General Validity of these instructions Safety instructions These instructions apply to the following lights: Make sure to read the instructions for use before putting the light into operation! - Lights equipped with Pulse HFMD from firmware vers. VFP 04.
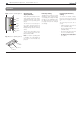
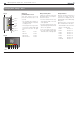
ENG Operating Manual Light Control „PULSE HFMD - Vers. IV“ Operation Fig.3 (Column operating panel) LED I Key I Logo Light bar Key II LED II Fig. 4 (Sensor operating panel) Operating and display elements All operating and setting functions can be carried out from the column operating panel (Fig. 3) as well as from the sensor operating panel (Fig.4). The functions and settings for the column operating panel are displayed via the light bar, the logo background light and the LEDs [I and II].
ENG Operating Manual Light Control „PULSE HFMD - Vers. IV“ Operation general Fig. 3 LED I Display Via the two keys [I and II] different functions can be activated, depending on which key is pressed: The selected light level is displayed via LED [I or II] in the pushbutton [I or II]: - Switch-on and switch-off - LED I lit Level I Key I - Change the light level - LED II lit Level II Logo - Change the light level The light bar shows the set intensity.
ENG Operating Manual Light Control „PULSE HFMD - Vers. IV“ Operation Main functions Fig. 3 Switching on Press the switch I - the light changes to light level I. LED I Key I Logo Light bar Key II LED II Press the switch II - the light changes to light level II. Switching off Briefly press the key on which the LED is lit - this will switch off the light. Change light level Briefly press the key on which the LED is not lit - this will switch the light to the other light level.
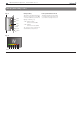
ENG Operating Manual Light Control „PULSE HFMD - Vers. IV“ Changing basic settings - Part 1 Fig. 3 Change to parameterisation mode LED I Key I Logo Light bar Key II LED II Fig. 6 LED 1 8 2 3 4 5 6 Keep both switches [I and II] pressed simultaneously for 10 seconds. - The operating panel changes to the parameterisation mode (first to setting level 1). - The background lit logo flashes (once per second).
ENG Operating Manual Light Control „PULSE HFMD - Vers. IV“ Changing basic settings - Part 2 Fig. 3 LED I Key I Logo Light bar Key II Change setting Leave parameterisation mode The LED on the light bar indicates whether a function is active (ON) or inactive (OFF) by permanent lighting or flashing, e.g.: The parameterisation mode is left if no switch has been pressed for 10 seconds. The settings are stored.
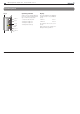
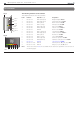
ENG Operating Manual Light Control „PULSE HFMD - Vers. IV“ List of functions Fig. 3 The following functions can be selected: The bold-printed values are the in-factory defaults Level Function Light bar (fig. 6) Designation 1 Function 1.1: LED 1 (dark green): Background light ON/OFF Key I 1 Function 1.2: LED 2 (light green) External activation ON/OFF Logo 1 Function 1.3: LED 3 (yellow) Burn-In function ON/OFF Light bar 1 Function 1.
ENG Operating Manual Light Control „PULSE HFMD - Vers. IV“ Change basic settings - Change setting level Fig.
ENG Operating Manual Light Control „PULSE HFMD - Vers. IV“ Change basic settings - Setting level 1 Fig. 3 LED I Actuation Display Press both keys for at least 10 seconds Logo flashes white Light bar LED 1 Activate setting level 1 Key I Logo Light bar Function 1 Release both keys Key II LED II Background light ON/OFF Change function from ON to OFF or vice versa Press key I Fig. 6 Note: LED 1 12 2 3 4 5 6 Note: The functions written in blue are not available.
ENG Operating Manual Light Control „PULSE HFMD - Vers. IV“ Change basic settings - Setting level 1 (continued) Fig. 3 Actuation Activate function 1.2 LED I External switching ON/OFF Press key II once Key I Logo Light bar Key II Activate function 1.3 Activate function 1.5 Activate function 1.
ENG Operating Manual Light Control „PULSE HFMD - Vers. IV“ Change basic settings - Setting level 2 Fig. 3 LED I Logo Function 2.1 Press both keys once for 10 seconds and once for 5 seconds Logo is off Lightbar LED 1+2 Sensitivity high ON/OFF Release both keys Key II LED II Display Activate setting level 2 Key I Light bar Actuation Change function from ON to OFF or vice versa Press key I Fig. 6 Note: LED 1 14 2 3 4 5 6 Note: The functions written in blue are not available.
ENG Operating Manual Light Control „PULSE HFMD - Vers. IV“ Change basic settings - Level Setting 1 (cont.) level 2 (continued) Fig. 3 Actuation Activate function 2.2 LED I Display Switch-on automatic ON/OFF Logo is off Bar display light green (LED 2) Press key II once Key I Logo Activate function 2.3 Press key II twice Light bar Key II Dual sensors ON/OFF Activate function 2.4 Sensor LED ON/OFF Logo is off Bar display orange (LED 4) Press key II 3 times LED II Activate function 2.5 Fig.
ENG Operating Manual Light Control „PULSE HFMD - Vers. IV“ Change basic settings - Setting level 3 Fig. 3 Actuation Display Activate setting level 3 (function 3.1 - 3.6) LED I Press both keys once for 10 seconds and twice for 5 seconds Key I Logo Light bar Change function Increase the follow-up time in stages Briefly press key I Key II LED II Fig. 6 Change function 16 2 3 4 5 6 The light bar shows the newly set follow-up time.
ENG Operating Manual Light Control „PULSE HFMD - Vers. IV“ Change basic settings - Setting level 4 Fig. 3 Actuation Display Activate setting level 4 (function 4.1 - 4.6) LED I Press both keys once for 10 seconds and three times for 5 seconds Key I Logo is off Lightbar LED 1+2+3+4 Logo Light bar Change function Key II Increase presence range Briefly press key I LED II Fig.
ENG Operating Manual Light Control „PULSE HFMD - Vers. IV“ Explanation of the functions (part 1) Fig. 3 LED I Key I Logo Light bar Key II LED II Function 1.1 Function 1.2 Function 1.3 Background light External switching Burn-in function Function to switch the logo backgrond light on and off. Function to operate the light via external switching elements. Function for burning in the lamps The function is basically set to “ON”.
ENG Operating Manual Light Control „PULSE HFMD - Vers. IV“ Explanation of the functions (part 2) Fig. 3 LED I Function 1.4 Function 1.5 Function 1.6 Write protection Light control Presencecontrol Function for admission or avoidance of setting variations. Function for the automatic readjustment of the set brightness in case the ambient brightness changes. Function to detect the presence of persons. Logo The default setting of the function is „OFF”, i.e.
ENG Operating Manual Light Control „PULSE HFMD - Vers. IV“ Explanation of the functions (part 3) Fig. 3 Function 1.7 Demo mode LED I Key I Logo Light bar Key II LED II Function to demonstrate and to test the light functions. The default setting of this function is “OFF”, i.e., the demo mode is inactive. All control times are working in the seconds range if the demo mode is switched on. Note: This mode is left automatically 10 minutes after the last key was pressed.
ENG Operating Manual Light Control „PULSE HFMD - Vers. IV“ Explanation of the functions (part 4) Fig. 3 LED I Key I Logo Light bar Key II LED II Function 2.1 Function 2.2 Function 2.3 Sensitivity high Switch-on automatic Dual sensors Function to change the sensitivity of the presence control. Function to admit or to suppress automatic switch-on with insufficient light or in case of presence (semi-automatic).
ENG Operating Manual Light Control „PULSE HFMD - Vers. IV“ Explanation of the functions (part 5) Fig. 3 LED I Key I Logo Light bar Key II LED II Function 2.5 Function 2.6 Sensor LED Continuous operation Parameter setting protection Function to switch both LEDs in the sensor operating panel on and off (see fig. 4). Setting function for continuous operation.
ENG Operating Manual Light Control „PULSE HFMD - Vers. IV“ Explanation of the functions (part 6) Fig. 3 Function 2.7 Function 3.1 - 3.6 Function 4.1 - 4.6 Special function Follow-up time Presence range LED I The special function is not available. Function to set the detection range of the presence sensor. Key I The function cannot be changed. Function to adjust the time after which the light is to be switched off if no presence is detected.
Order No. 405 221 110 - © copyright H.Waldmann GmbH & Co. KG - nB / 05.2011 - TB - Subject to modifications - Printed in Germany ENG 24 Operating Manual Light Control „PULSE HFMD - Vers.