
How-To Guide
20
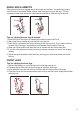
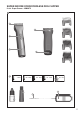
Attaching / removing the comb
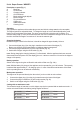
1. Slide the attachment comb onto the blade set in the direction of the arrow until it reaches the
limit (Fig. 6a).
2. The attachment comb can be removed by pushing it in the direction of the arrow (Fig. 6b).
3. Attachment combs should be removed after every use.
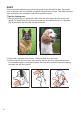
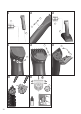
Changing the blade set
WARNING
Thebladesetisdesignedtocutandmaycauseinjuryormaterialdamageifhandledincorrectly
1. Switch off the appliance using the on/off switch (Fig. 3b).
2. Remove any attachment combs.
3. The blade should be removed by applying pressure to the top of the blade and pushing it away from
the clipper in the direction of the arrow (Fig. 7a).
4. To attach the blade to the clipper, hook the small plastic lug at the base of the blade chassis into the
small recess in the housing and press it down until it clicks into position (Fig 7b).
5. Replace a blunt or damaged blade set with an original spare part only. Spares can be ordered
through your dealer or Wahl Customer Services at www.wahlstore.co.uk .
6. Lubricate the new blade set before use.
Note: If the small plastic lug at the base of the blade chassis is broken, this will prevent the blade staying
on the clipper and a replacement will be required.
Maintenance
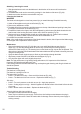
• Remove the attachment comb (Fig. 6b) after every use and lift the blade set away from the
clipper (Fig. 7a). Use the cleaning brush to remove any cut hairs from the housing opening
and from the blade set (Fig. 8). The cleaning lever on the blade set (Fig. 9a) can also be pressed. This
allows the cut hairs that accumulate between the bottom blade and the top blade to be easily removed
using the cleaning brush.
• Spraythebladesetwithhygienicspraytoushanydirtandhairsthroughtheblade.
• Wipeawayexcessuidthenoilthebladesetwithclipperoil(Fig.9).
• Only wipe the clipper with a soft, slightly damp cloth.
Note: For high performance, long lasting cutting performance, it is important to oil the blade set
frequently, at least before and after every use.
If the cutting performance deteriorates after long use despite regular cleaning and oiling, the blade set
should be replaced.
Trouble Shooting
The blade set is cutting badly.
The blade set is pulling the hair out.
The battery life is too short.
• Cause – The blade set is dirty – Clean and oil the blade set (Fig. 8/9).
• Cause – The blade set is blunt or worn out – Replace the blade set (Fig. 7).
Skin injury
• Cause – Too much pressure on the skin as you clip – Apply less pressure.
• Cause–Cuttingangleistoohigh–Holdtheappliancesotheatsurfaceofthebladeisattotheskin
of your pet.
• Cause – Broken teeth on the blade – Replace the blade set (Fig. 7).
Charging indicator light does not light up
• The clipper must be switched off for charging
• There may be a defective power supply. Ensure there is a faultless contact between the plug-in
transformer and the socket. Check the mains cable for damage. Ensure the main power supply is
working correctly.