
How-To Guide

19
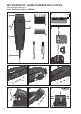
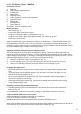
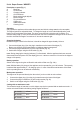
Description or parts (Fig. 1)
A Blade set
B On/off switch
C Charging indicator
D Oil for blade set
E Bladecuttinglengthadjuster
F Base of clipper
G Plug-in transformer
H Clipper plug
I Attachment combs
J Cleaning brush
Operation
Only operate the appliance with an alternating current and with the voltage stated on the nameplate.
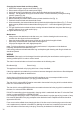
Thisclipperfeaturesanadjustableblade.Tochangethelengthofcutfromthebladeadjustthesmall
black lever (E) at the base of the blade. This lever moves from left to right through 5 positions. The
shortest cutting length (0.7mm) will be achieved when the lever is switched to the right. Move the lever to
the left to increase the length to a maximum of 3mm at the extreme right.
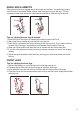
Charging the battery
Beforetheclipperisusedforthersttime,itshouldbechargedforapproximately16hours.
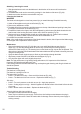
1. Connect the clipper plug (H) on the plug-in transformer to the base of the clipper (F).
Battery over-charging is prevented thanks to intelligent charge management.
2. Connect the plug-in transformer (G) to the mains socket (Fig. 2b).
3. Switch off the clipper using the on/off switch (Fig. 3b).
note: During charging the charging indicator (C) is illuminated. After the appliance has been removed
disconnected from the power cord, the display goes out. It takes no more than 16 hours for the clipper to
charge to full capacity.
Battery operation
Switch on the clipper using the on/off switch and switch off after use (Fig. 3a/b).
note: With the battery fully charged, the appliance can be operated for up to 100 minutes. This capacity
isattainedafterapproximately5–10chargingcycles.Incaseofinsufcientmaintenanceoftheblade
set, the operating time can be reduced considerably.
Mains power operation
This clipper can be powered directly from the mains if you do not wish to work cordless.
1. Connect the clipper plug (H) on the plug-in transformer to the base of the clipper.
2. Connect the plug-in transformer (G) to the mains socket (Fig. 2b).
3. Switch on the clipper using the on/off switch (Fig. 3b).
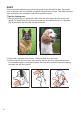
Cutting with an attachment comb
To increase the length of coat that is cut, this clipper may also be operated with an attachment comb. 6
combs are included with this kit offering cutting lengths as follows:-
No. 1 comb 4.5mm No. 4 comb 12mm
No. 2 comb 6mm No. 6 comb 18mm
No. 3 comb 9mm No. 8 comb 25mm
Model: Super Groom - WM6872