
How-To Guide
15
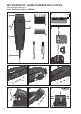
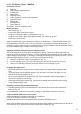
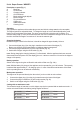
Description of Parts
A. Blade set
B. Cuttinglengthadjustmentlever
C. On/off switch
D. Mains cable
E. AdjustingScrew
F. Lockingswitchforcuttinglengthadjustment
G. Attachment comb
H. Blade guard
I. Cleaning brush
J. Oil for blade set
Not shown: Scissors, grooming comb.
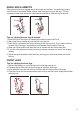
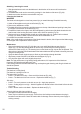
Mains Operation
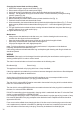
• Oil the blade (Fig. 6)
• Connect the clipper to the power supply.
• Using the on/off switch, switch on the appliance (Fig. 1a)
• Using the on/off switch, switch off the appliance after every use (Fig. 1b) and
disconnect from the mains.
note: An audible click may be heard when switching on the appliance. This is the result of the torque
of the alternating current drive unit. This is normal and not an indication of a fault with the clipper. If a
continuousnoiseoccurstheclipperisnotdefectivebutshouldbereadjustedusingtheadjustmentscrew
(E) for the available supply voltage (see following section).
Adjusting the blade amplitude (clipper noisy/loud noise)
The blade amplitude is set at the optimum setting at the factory. However, the blade amplitude may
changeasaresultofvoltageuctuations.Forlowervoltagethebladeamplitudecanbesmallerandfor
highervoltageitmaybebigger.Ifnecessary,bychangingthesettingoftheadjustingscrew(E),youcan
adjustthebladeamplitudeyourself.Youwillneedascrewdrivertodothis.
1. Using the on/off switch, switch on the appliance (Fig. 1a).
2. Turntheadjustingscrew(E)inaclockwisedirectionuntilyouhearaloudnoise(Fig.2a).
3. Thenturntheadjustingscrewanti-clockwiseuntiltheloudnoisestops(Fig.2b).
Cutting length adjustment
• Without the attachment comb, the normal cutting length of the clipper blade is approximately
1mm.
• Thecuttinglengthcanbeadjustedbetween1mmand3mm,evenwhentheclipperisinuse.
• Slide down the locking switch (Fig. 3b).
• Bymovingtheadjustmentleverattheside(Fig.4a)itispossibletosetthecuttinglengthat
various pre-set positions (Multi-click).
• Sliding the locking switch upward (Fig. 3a) unlocks the setting and restores the normal cutting
length of approximately 1mm.
Attaching and removing the attachment comb
1. Slide the attachment comb onto the blade set in the direction of the arrow until it reaches the
limit stop (Fig. 5a).
2. The attachment comb can be removed by pushing it in the direction of the arrow (Fig. 5b).
Clipping with the attachment comb in place
Various attachment combs are included with your Starter Kit.
#1 (4.5mm), #2 (6mm), #3 (9mm), #4 (12mm)
Additional attachment combs are available as an accessory at Wahlstore.co.uk.
Whenusinganattachmentcomb,toachievethedesiredcuttinglengths,theadjustmentlevershouldnot
be locked (Fig. 4b); to achieve this slide the locking switch upward (Fig. 3a).
Model: Pet Starter Clipper - WM6406