
Technical data


Fieldbus Controller 750-841 • 83
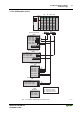
Starting up an ETHERNET TCP/IP fieldbus node
WAGO-I/O-SYSTEM 750
ETHERNET TCP/IP
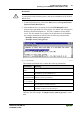
10. Now it is important to restart the controller by resetting the hardware. To
do this, cycle power to the fieldbus controller for approximately 2 seconds or
press the operating mode switch down, which is located behind the
configuration interface flap on the front of the controller.
Following this, you should see a reply from the PFC stating that the IP
address has been accepted (no errors). The IP address is now temporarily
stored in the controller. Do not cycle power on the controller until the BootP
protocol has been disabled in the PFC.
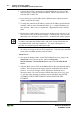
11. Click on the Stop button, and then on the Exit button to close the BootP
Server .
3.1.6.5 Testing the Function of the Fieldbus Node
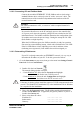
1. To test the controller’s newly assigned I/P address, start a DOS window by
clicking on the Start menu item Programs/MS-DOS Prompt
2. In the DOS window, enter the command: "ping " followed by the PFC’s IP
address in the following format:
ping [space] XXXX . XXXX . XXXX . XXXX (=IP address).
Example: ping 10.1.254.202
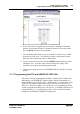
Fig. 3-13: Example for the Function test of a Fieldbus Node P012910d
3. When the Enter key has been pressed, your PC will receive a query from
the controller, which will then be displayed in the DOS window.
If the error message: "Timeout" appears, please compare your entries again
to the allocated IP address and check all connections. Verify that the
TXD/RXD LEDs flash when the ping command is issued.
4. When the test has been performed successfully, you can close the DOS
prompt.
5. Since the IP address is still temporarily stored in the controller. Do not
cycle power on the controller until the BootP protocol has been disabled in
the PFC.