
User manual


GB
9
TurboRoll
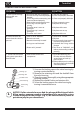
CLEANUP
Do not allow battery compartment and motor housing to come into
contact with water or other liquids.
Danger of short-circuits!
Clean the roller only with water (warm and soapy water is recommended).
Press the switch back (Fig. 13), in order to suck the paint contained in the roller frame 1.
back into the paint cylinder.
Put the TurboRollTM with lling valve onto the suction tube and press the switch
2.
forward. This will push the remaining paint back into the paint container. (Fig. 14)
Press locking tab and remove roller cover assembly from the arm. (Fig. 15,
3.
a) Insert thumb to rst knuckle, pry and pull the cap from the roller cover.
Once the cap is removed, push the roller core out the other end. (Fig. 16, b)
Clean with water.
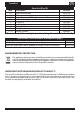
Remove ll tube from the clip and insert it into the ll valve. Set the lever to "MANUAL" 4.
(Fig. 16, a). Submerge ll tube into water. Pull/push plunger 5 times. (Fig. 16, b) Remove
ll tube from the ll valve.
Submerge fill valve and roller arm into water. Pull/push plunger 5 times.
5.
Remove the roller arm.
Submerge the connecting area and the ll valve into water. Pull/push plunger 5
6.
times.
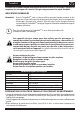
STORAGE
i
Important: Remove the batteries before storing the TurboRoll
TM
.
Remove the suction tube from the lling valve and make sure that the
lling valve points down when stored.
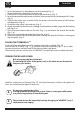
Turn the large union nut in front of the handwheel anti-clockwise to loosen it. Then
1.
remove the piston rod from the paint cylinder.
Grease the O-rings on the front of the piston rod evenly. (Fig. 2)2.
Insert the piston rod into the paint cylinder. Take care not to twist or damage the O-rings.
3.
(Fig. 3)
Tighten the union nuts in order to x the piston rod and the cover of the battery
4.
compartment. (Fig. 4).
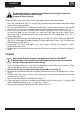
Grease the inner side of the lling valve (Fig. 17)5.
Clean and pack a generous amount of petroleum jelly on the seal (a) , O-ring (b) and 6.
other indicated bearing areas (c) of the arm. (Fig. 18
Reassemble the paint roll and the roller frame. (Fig. 5-7).7.