
User`s manual
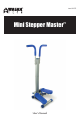


Mini Stepper Master
™
by Wagan Tech
3
www.wagan.com
© 2010 Wagan Corporation
All Rights Reserved
Wagan and wagan.com are trademarks used by Wagan Corporation
User’s Manual—Read before using this equipment
4
Maintenance
• Inspect the Mini Stepper at regular intervals to check to see whether
there are loose joints and/or parts that have been damaged or worn.
• Put lubricating oil or grease on hydraulic components of the Mini
Stepper and any of its moving parts at 3-month intervals. Applying
lubricating grease may help to minimize noise and to fix uneven or
rough movements of the pedals, should these occur.
• Store the Mini Stepper in a cool and dry environment.
• Don’t clean the surface of the Mini Stepper with organic solvents (i.e.
gasoline, benzene, etc.) or its surfaces may become damaged.
• Inspect the unit thoroughly before beginning exercise on it. Make
sure that there are no issues with the machine such as loose joints,
loose hydraulic parts, or wobbling pedals.
• This product is designed only for use by individuals with a weight not
exceeding 225 lbs.
Using the Mini Stepper
We recommend that you utilize your Mini Stepper on a daily basis, for half
an hour at a time. We believe you will feel its marvelous cardio-training
effects after one month of use. The Mini Stepper is excellent whether used
at home or in the office. For example, even exercising during a break
at work would produce great results. Rather than feeling fatigued or
exhausted, you will feel refreshed and energized with the Mini Stepper!
• Persons with hypertension, obesity, and heart disease should not
perform strenuous exercise using the Mini Stepper.
• We do not recommend that you exercise when feeling exhausted or
tired.
• We suggest that you keep a healthy daily diet; it is strongly
encouraged that you consume sufficient amounts of nutrients in each
category of the food pyramid that is outlined on the U.S. Department
of Agriculture’s website.
Tension Adjustment
1. Locate the tension key, which looks like a
screw with a triangular cap (Figure 1).
2. Locate the threaded hole on the opposite side
on the stepper (Figure 2).
3. Twist the tension key slowly into the threaded
hole on the backside of the main frame (2).
4. One side of the stepper will be automatically
lifted up as the tension key is screwed into the
main frame (2). As the tension key is fastened
into the main frame, the amount of force
required to screw the key in increases (Figure
3). Hint: Lift up one of the stepper pedals
manually before inserting the tension key.
5. Once the tension key has been properly
adjusted, please test out the stepper by
stepping on each pedal in an alternating
fashion.
6. If the tension key has been properly installed,
one pedal will be up while the other will be
down as you put pressure on either of the
pedals.
7. Adjust the tension key according to how firm
you would prefer the steps to be.
8. If the tension key is all the way in, the pedals
have been adjusted to provide the most
intense workout available.
9. If the tension key is loosened so that it is
barely screwed in, the pedals have been
adjusted to provide the least demanding
workout available.
Figure 1
Figure 2
Figure 3