
Product Manual


©2018 Wagan Corporation. All Rights Reserved.
Wagan Tech and wagan.com are trademarks of Wagan Corporation.
User’s Manual—Read before using this equipment
10
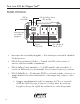
NOTE: Crimp-on ring terminals are required on all cable ends. The cable
ends need to be stripped of insulation for 1/2 inch before crimping on ring
terminals. Select a crimp terminal size to fit the gauge cable and inverter
and battery terminal connectors. After crimping make sure that the cable
connectors are secure on the cables so there are no loose connections.
6. Remove the terminal covers from the inverter. Slide the cable through the
correct terminal cover.
7. Connect the Negative (black) cable end to the inverter terminal and battery
Negative Terminal. Make sure you have good, secure connections.
8. Recheck and make sure the DC cable fuse is installed in the fuse holder.
CAUTION: Making an initial connection between the positive cable end
and the inverter’s positive terminal may cause a spark. This is a normal and
is a result of capacitors in the inverter starting to charge. Because of the
possibility of sparking, it is extremely important that both the inverter and
the battery bank be positioned away from any source of flammable fumes
or gases. Failure to heed this warning can result in fire or explosion. Do not
make the positive terminal connection immediately after the batteries have
been charging. Allow time for the battery gasses to vent to outside air.
9. Attach the positive cable to the Positive DC connector on the battery and
then the inverter. Make sure the connections are tight and secure.
10. Turn on the inverter from the Front Panel Power Switch "|"
11. Make certain that the green Operating LED is lit and the FAULT LED
indicator is not lit.
12. Turn Off "O" the inverter. The Fault LED may briefly “flash”. This is normal.
The audible alarm may also sound a short “chirp”. This is also normal.
13. When you have confirmed that the appliance to be operated is turned off,
plug the appliance into one of the two AC outlets on the front panel of the
inverter.
14. Turn the inverter on.