
Technical data


Connecting the IU0U automatic charger PerfectCharge
46
You will find the circuit diagrams with all possible wiring options for the vari-
ous IU0U automatic chargers in fig. 9, page 7 to fig. c, page 9.
Laying the battery cables
➤ Lay the positive cable of the batteries to the IU0U automatic charger.
I
Note
To connect more than one battery, connect the negative terminals
of the batteries to an earth cable and connect the earth cable to the
IU0U automatic charger.
➤ Lay the negative cable of the battery or earth cable to the IU0U automatic
charger.
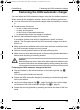
Preparing the IU0U automatic charger
➤ Turn the main switch to “0”.
➤ Unscrew the four fastening screws (2) from the rear panel using the hex-
agon socket wrench provided.
➤ Remove the rear panel (1).
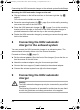
Connecting the battery cables to the IU0U automatic charger
I
Note
The IU0U automatic charger's connections are suitable for cables
with cross-sections of 10 mm² to 25 mm².
➤ Fit wire sleeves to the ends of the cables to ensure permanent contact.
➤ Connect the positive battery cable to the respective slot:
– Supply battery: “BATT 1+”, “BATT 2+”, “BATT 3+”
– Starter battery: “START BATT +” (IU152A), “BATT 1+” (IU154A,
IU252A)
➤ Connect the negative battery cable or earth cable to the respective slot:
– Supply battery: “BATT –”
The following instructions apply to all cables accordingly:
➤ Fit cable sleeves on the ends of the cables (4).
➤ Undo the safety bolt (3) slightly.
➤ Insert the cable sleeves (4) in the slots provided.
_PerfectCharge_IU152A-IU802A.book Seite 46 Dienstag, 15. September 2009 5:19 17