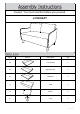
Caution: You must read this before you proceed. LOVESEAT Label Picture Description Qty A1. Left Armrest 1 A2.
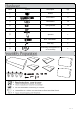
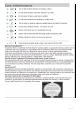
Label Picture Description Qty ① Gasket 7 ② Screw Arbor 9 ③ Flat Washer 10 ④ Spring Washer 10 ⑤ Nut 9 ⑥ Spanner 1 ⑦ Bolt (M8*25MM) 2 ⑧ Allen Key 1 ⑨ Connecting Piece(Option for 2 or 3 Lovesets) 1 2 of 8
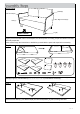
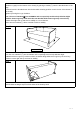
OVERVIEW Pilllow(D) Left Armrest(A1) Right Armrest(A2) Seat (C) Leg (E) FRONT FACING This Loveseat has multiple parts and may require up to 30 minutes to assemble. To give you an overview of the Loveseat parts, the above picture is to help you put the various Loveseat parts into perspective. Please read through the instructions to familiarise yourself with the parts and steps before assembly.
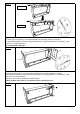
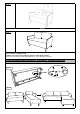
Step 3 B Step 3.1 C B Step 3.2 C Lay the Seat(C) on a flat surface as shown in the picture. 3.1 Insert the Screw Arbor(② of the Backrests(B) into mounting positions of Seat(C). 3.2 Attach Backrests(B) to Seat(C) using Flat Washers(③), Spring Washers(④) and Nuts(⑤), with Spanner(⑥) as pictured above. Do not fully tighten the Nuts. Step 4 A2 C A1 Lay the Seat(C) on a flat surface as shown in the picture. Insert the Screw Arbor(②) of the Right Armrests(A2) into mounting positions of Seat(C).
Install the Legs(E) into the bottom of the Seat(C) by placing a Gasket(①) onto the threaded stem of the Legs. And then insert the threaded stem into the threaded mounting position at each Corner of the Bottom of the Seat(C). Tighten by turning the Legs clockwise. Note: The use of Gaskets(①) are OPTIONAL and are especially useful to help alleviate slight wobbles. Some Legs may need more than one Gasket whilst some Legs may not need any. Position Sofa right side up and test for stability on a Level Surface.
Step 8 D D Put the Pillows (D) on the Loveseat. Step 9 Your Loveset is ready for use. Caution: This Loveset can only be used on a flat, level surface. There is no need to use Connecting Piece(⑨) if you bought 1 Loveset. If you already purchased 2 lovesets, Please read on ⑨ ⑦ Step 1.1 ⑧ ④ ③ Step 1.
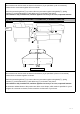
This Loveseat can also be used as shown in the Picture. (If you purchase a pair of Loveseats) Position the two Loveseats together in line as shown. Attach the Connecting Piece(⑨) to connect the two Loveseats together using Bolts(⑦), Spring Washers(④), and Flat Washers(③) with Allen Key(⑧) as shown in the picture. Bolts should be fully installed first, and then tightened securely in an even, sequential manner.
of 8