
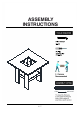
Assembly Instructions (Table)

3
4
7 / 7
#G
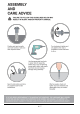
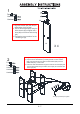
I. With the help of another person, carefully place the table top (#1)
facing down on a protective surface. Align the assembled
legs/shelf with the pre-drilled holes on the table top (#1).
II. Prepare 8 bolt assemblies by inserting FIRST the lock washer (#E)
onto the bolt (#B) and then the flat washer (#D) onto the SAME bolt
(#B), in that order.
III. Insert the bolt assemblies through the holes of the brackets (#G)
and secure those bolts using the Allen wrench (#F) to lock them
with the table top (#1).
Turn right (clockwise) to tighten
Part
Hardware
Hardware
Hardware
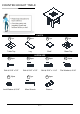
Place the glass top (#4) onto the table top
(#1). Make sure the table is rested on a flat
surface and does not feel loose or wobbly. If it
does, double check that the bolts/screws are
secured and properly tightened.
Part
#1
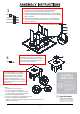
To install the batteries (not included),
remove the screw that holds the battery
cover by using a Phillips screwdriver.
Install new AA-size 1.5-volt alkaline
batteries with correct polarity (+,-) by
following the illustration inside the battery
cover. Close the battery cover and tighten
back the screw.
Caution:
* Use batteries of the same type.
* Do not mix old and new batteries.
* Do not mix alkaline, standard (carbon-zinc),
or rechargeable (nickel-cadmium) batteries.
* Do not use rechargeable batteries.
* Do not try to recharge non-rechargeable batteries.
* Remove exhausted or corroded batteries.
* If light is not used for more than a week, remove the batteries to prevent
depletion and corrosion.
#4