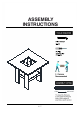
ASSEMBLY INSTRUCTIONS EASY 1/7 DIFFICULT
Thank you for your purchase! We hope you enjoy this new addition to your home for many years to come. Our commitment to providing quality products does not simply end when you purchase our product. We fully stand behind our products from start to finish. We can help with assembly questions as well as, if necessary, replacing damaged or missing parts. To help expedite our service, please have these assembly instructions readily available, along with your order receipt.
/7
/7
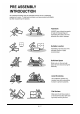
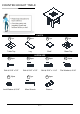
COUNTER-HEIGHT TABLE PARTS #1 1pc #2 4pcs #3 1pc #4 1pc Table Top Leg Shelf Glass Top HARDWARE #A 8pcs #B 8pcs #C 8pcs #D 16pcs Bolt ∅ 5/16" x 7/8" Bolt ∅ 5/16" x 7/8" Bolt ∅ 5/16" x 1-1/4" Flat Washer ∅ 5/16" #E 16pcs #F 1pc #G 4pcs Lock Washer ∅ 5/16" Allen Wrench Bracket 5/7
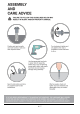
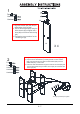
1 Part Hardware Hardware #G I. Align the bracket (#G) with the predrilled holes of the leg (#2). II. Secure the brackets (#G) using the Allen wrench (#F) to tighten the 4 bolts (#A) to lock them with the leg (#2). III. Repeat the process above for the remaining 3 legs. #2 2 Part Part Hardware Hardware X4 I. Align the shelf (#3) with the pre-drilled holes of the 4 legs (#2). II.
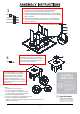
3 Part Hardware Hardware Hardware I. With the help of another person, carefully place the table top (#1) facing down on a protective surface. Align the assembled legs/shelf with the pre-drilled holes on the table top (#1). II. Prepare 8 bolt assemblies by inserting FIRST the lock washer (#E) onto the bolt (#B) and then the flat washer (#D) onto the SAME bolt (#B), in that order. III.