Help Contents Back Customizing Opening the Control Panel Control Panel Features Tabs Control Panel Lists Control Panel Buttons Customizing Your Pen and Cordless Mouse Graphire2 Pen Tabs Graphire2 Cordless Mouse Tabs Adjusting Tip Feel Adjusting Double-Click Customizing Tool Buttons Button Functions Adjusting Eraser Feel Tablet to Screen Mapping Positioning Mode Orientation Aspect Tablet Area Display Area Customizing the Graphire2 Cordless Mouse Customizing the Cordless Mouse Fingerwheel Customizing the Po
Help Contents Back << >> OPENING THE CONTROL PANEL Open the control panel with the Graphire2 tool you wish to customize. 1. Using your Graphire2 tool, open the Apple menu and choose CONTROL PANELS. 2. Double-click on the tablet icon. To open the Wacom control panel, double-click here with the tool you wish to customize.
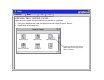
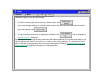
Help Contents Back << >> CONTROL PANEL FEATURES Use the Wacom control panel to customize your Graphire2 pen and mouse set. The Pull-Down Menus access many control panel features. The Application List displays applications with customized settings. These buttons add an application or tool to the lists at the left. The Help button displays online Help. The Tool List displays tools that are customized for the above selected application.
Help Contents Back << >> TABS The tabs allow you to customize your Graphire2 tablet, Pen, and Cordless Mouse. When you open the control panel with a Graphire2 tool, the tool is automatically selected in the TOOL LIST and the appropriate tabs are displayed. To change settings for your other tool, select the appropriate tool icon to display the corresponding tabs. These tabs are displayed for the Graphire2 Pen.
Help Contents Back << >> Tab buttons apply only to the selected tab: • To set the currently open tab to its factory default values, click • If you have changed settings on a tab and want to return the tab to the last state when the control panel was opened, click • To copy settings from one tool or application to another, click This will display the Copy Settings To... dialog box. As you explore the control panel tabs, experiment with different settings to find what works best for you.
Help Contents Back << >> CONTROL PANEL LISTS Located in the upper portion of the control panel, the APPLICATION LIST and TOOL LIST allow you to create different tablet and tool settings for individual applications. For example, you might set your pen tip for a soft feel in Painter and a firm feel in all other applications. The APPLICATION LIST displays applications that have custom tool settings associated with them.
Help Contents Back << >> • When you first install your Graphire2 pen and mouse set, the APPLICATION LIST displays the ALL APPLICATIONS icon. This contains tablet and tool settings for all of your applications. • The TOOL LIST displays an icon for the Graphire2 Pen and Cordless Mouse. Each tool icon is automatically added to the TOOL LIST when a Graphire2 Pen or Cordless Mouse is first used on the tablet. See Adding a Tool for more information.
Help Contents Back << >> CUSTOMIZING YOUR PEN AND CORDLESS MOUSE To change tool settings, open the control panel using the tool you wish to customize. The tool will automatically be selected in the TOOL LIST, and the appropriate tabs will be displayed. To customize settings for a different tool, select it from the TOOL LIST by clicking on its icon.
Help Contents Back << >> ADJUSTING TIP FEEL To adjust the sensitivity of your Graphire2 Pen tip, select the TIP FEEL tab. To create broad brush strokes or to click with a light touch, use a soft tip setting. For maximum control while drawing thin lines, use a firm tip setting. A checkmark appears when advanced settings are in effect. Toggles to the advanced options display. Drag the slider to a softer or firmer setting. Make several pen strokes to test the current pressuresensitivity setting.
Help Contents << Back >> ADJUSTING DOUBLE-CLICK Double-clicking with the pen tip can be made easier by expanding the tap area that accepts a double-click (the double-click distance) and reducing the speed required to perform a double-click. This can be set in the DOUBLE CLICK tab. Because a large double-click distance may adversely affect your brushstrokes in some drawing applications, Wacom recommends setting a small double-click distance and using the lower side switch to double-click.
Help Contents Back << >> CUSTOMIZING TOOL BUTTONS Select the TOOL BUTTONS tab to change the functions assigned to the eraser, side switch, and tip of your Graphire2 Pen. For each tool button, a pull-down menu enables you to choose the function that will be performed. Select the function to perform when using the eraser. Select the function to perform when pressing the upper side switch. Select the function to perform when pressing the lower side switch.
Help Contents Back << >> Button Functions Each button has a pull-down menu that allows you to choose the function that will be performed when the button is pressed. The following list describes all available functions. However, some options are not available for all buttons. • CLICK. Default setting for the Graphire2 Pen tip. This option simulates a mouse button click. Be sure at least one button performs this function so you can always navigate and click. • DOUBLE-CLICK.
Help Contents • Back << >> KEYSTROKE.... Enables you to simulate a series of keystrokes. When you select this option, the DEFINE KEYSTROKE dialog box appears. There, you can enter a keystroke or keystroke sequence to play back. Keystroke combinations can include letters, numbers, function keys (such as F3) and modifier keys (such as SHIFT, OPTION, COMMAND, and CTRL). After defining a keystroke sequence, click OK.
Help Contents • Back << >> MODIFIER.... Enables you to simulate modifier key(s) (such as SHIFT, OPTION, COMMAND, and CTRL). Many applications use modifier keys to constrain the size or placement of objects. If you select this option, the DEFINE MODIFIERS dialog box appears. There, you select the modifier key(s) to simulate. You can select the CLICK box plus one or more modifier key options to define the function you want your tool button to simulate.
Help Contents • Back << >> MACRO.... Enables you to play a macro sequence. When you select this option, the SELECT MACRO dialog box appears. There, you can select a predefined macro to play back. After selecting a macro, click OK. Choose the macro type. Select the macro you wish to use. Note: Before you can add macros, you must first create them with a third-party macro application.
Help Contents Back << >> • PRESSURE HOLD. (Graphire2 Pen only.) Sets a button so that, when pressed, the pressure is locked at the current pressure level until the button is released. For example, you can paint with pressuresensitivity until you reach the brush size that you like. You can then press the button and continue painting with the same size brush until the button is released. • MODE TOGGLE.... Toggles between Pen Mode and Mouse Mode. When first setting a tool button to MODE TOGGLE...
Help Contents Back << >> • POP-UP MENU. Displays a Pop-up Menu on your screen. See Customizing the Pop-up Menu for more information. • ERASE. Default setting for the eraser. • IGNORED. Disables the button function. • Application Defined. (Graphire2 Cordless Mouse only.) Only the button number is reported to your application. Use this setting when using applications that have built-in support for tool buttons.
Help Contents Back << >> ADJUSTING ERASER FEEL To adjust the sensitivity of your Graphire2 Pen eraser, select the ERASER FEEL tab. To erase with a broad stroke or to click with a light touch, use a soft tip setting. For maximum control while erasing, use a firm eraser setting. A checkmark appears when advanced settings are in effect. Toggles to the advanced options display. Drag the slider to a softer or firmer setting.
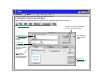
Help Contents Back << >> TABLET TO SCREEN MAPPING To change the relationship between tool movement on your tablet and cursor movement on the screen, select the MAPPING/SPEED tab. The default POSITIONING MODE for the Graphire2 Pen is PEN MODE, which means that each point on the tablet maps to a corresponding point on the screen. (The default setting for the Graphire2 Cordless Mouse is MOUSE MODE.) In PEN MODE, the MAPPING/SPEED tab looks like this: Select the Orientation of your tablet. Positioning Mode.
Help Contents Back << >> With MOUSE MODE selected, the MAPPING/SPEED tab looks like this: Positioning Mode. In MOUSEMODE, the screen cursor moves with relative positioning. This is the default mode for the Graphire2 Cordless Mouse. Select the Orientation of your tablet. Sets the screen cursor acceleration when in MOUSE MODE. Select a slower or faster screen cursor speed when in Mouse Mode.
Help Contents Back << >> Positioning Mode The POSITIONING MODE controls how the screen cursor moves. • In PEN MODE, wherever you place a Graphire2 tool on the tablet, the cursor jumps to the corresponding point on the screen. This is required for tracing. • In MOUSE MODE, the screen cursor is positioned like a mouse, requiring a “pick up and roll” action to move the cursor on the screen.
Help Contents Back << >> Orientation If you are working with a tall monitor or prefer to work with the tablet in a different position, you can rotate the tablet to one of the following orientations: • LANDSCAPE. Tablet orientation is horizontal, with the tablet cable at the top. This is the default setting. • PORTRAIT. Rotate the tablet 90 degrees clockwise from landscape orientation. The tablet orientation will be vertical, with the tablet cable on the right side. • LANDSCAPE FLIPPED.
Help Contents Back << >> Aspect Aspect defines the constraints of the tablet to screen relationship. ASPECT options include: • ONE TO ONE. Sets a 1:1 scale between the tablet and the display. Moving your tool one inch on the tablet will move the cursor one inch on the screen. A traced image appears the same size as the original image on your display screen. A screen resolution of 72 DPI is used in calculations.
Help Contents Back << >> Tablet Area These settings allow you to define the tablet area that will be mapped to the display area. Uses the entire active area of the tablet for tablet to display mapping. This is the default setting. Displays the PORTION OF TABLET dialog box where you can select a portion of the tablet’s active area for tablet to display mapping.
Help Contents Back << >> Enter coordinates to select the tablet area. • • Select UNITS of measure for the displayed values. A count equals one line of tablet resolution. Enter values for the TOP, LEFT, BOTTOM, and RIGHT boundary of the tablet area. Values are measured from the top left corner of the tablet’s active area. Drag corners of the foreground graphic to select the tablet area. The background graphic represents the entire active tablet area.
Help Contents Back << >> Display Area The DISPLAY AREA options allow you to define which portion of the display screen your tablet will map to. • ENTIRE DISPLAY. Select this option to access the entire display. This is the default setting. If more than one monitor is in use, a pull-down menu is displayed with options for selecting ALL MONITORS or individual monitors. • PORTION OF DISPLAY.... This option allows you to select a portion of the display for tablet to screen mapping.
Help Contents Back << >> CUSTOMIZING THE GRAPHIRE2 CORDLESS MOUSE To modify your Graphire2 Cordless Mouse button settings, select the TOOL BUTTONS tab. Select the function to perform when pressing the left button. Select the function to perform when clicking the fingerwheel button. Refer to Customizing the Cordless Mouse Fingerwheel to select the function to perform when rolling the fingerwheel. Select the function to perform when pressing the right button.
Help Contents Back << >> CUSTOMIZING THE CORDLESS MOUSE FINGERWHEEL To customize your Graphire2 Cordless Mouse fingerwheel, choose the FINGERWHEEL tab. Sets the fingerwheel to scroll the selected number of lines for each notch of fingerwheel movement (in most applications). Enter a value (1 to 15) to set the amount of movement. Roll the fingerwheel forward to scroll up, and back to scroll down. Disables the fingerwheel function.
Help Contents Back << >> CUSTOMIZING THE POP-UP MENU Select the POP-UP MENU tab to customize the available functions on the Pop-up Menu list. The Pop-up Menu list may include predefined macros, keystroke functions, and mapping options. To display the Pop-up Menu, set one of your tool buttons to the POP-UP MENU function. Whenever you push that button, the Pop-up Menu is displayed. Select items in the Pop-up Menu by clicking on them.
Help Contents Back << >> ADD MACROS To add a macro to the Pop-up Menu, click on the ADD MACRO... button. A dialog box will appear where you can select the name of a macro function to add. You can also set different macros for different applications. See Working with Application-Specific Settings for more information. Note: Before you can add screen macros, you must first create them with a third-party macro application.
Help Contents Back << >> SETTING MOUSE SPEED To change the screen cursor acceleration and speed when in MOUSE MODE, click on the SET MOUSE SPEED... button (located on the POP-UP MENU tab) to display a dialog box where you can make your adjustments. If you removed the PEN and MOUSE mode options from the menu list, this button is replaced with the ADD MAPPING OPTIONS button, which enables you to add PEN and MOUSE mode options back to the Pop-up menu list. Sets the screen cursor speed when in MOUSE MODE.
Help Contents Back << >> ADD MAPPING OPTIONS Click on the ADD MAPPING OPTIONS button (when visible) to add the following mapping options to the Pop-up Menu list: PEN MODE and MOUSE MODE. REMOVING POP-UP MENU OPTIONS To remove mapping option(s), macro(s), or keystroke function(s) from the Pop-up Menu list, select the function(s) you wish to remove and click the REMOVE button. Mapping options must be added or removed as a single item.
Help Contents Back << >> WORKING WITH GRAPHIRE2 TOOLS The Wacom control panel is designed to help you customize and keep track of your Graphire2 tool settings. The tool you use to open the control panel is automatically selected, and the appropriate tabs for that tool are displayed. If application-specific settings have not been added, the ALL APPLICATIONS icon is displayed and the tool settings apply for all applications.
Help Contents Back << >> ADDING A TOOL When you place a Graphire2 Pen or Cordless Mouse on the tablet, it is automatically added to the control panel’s TOOL LIST and will function with its default settings. You can customize a tool by opening the Wacom control panel and changing the tab settings. When you select a tool from the TOOL LIST, the appropriate tab settings for that tool are displayed. Any changes you make to the tab settings will then apply to that tool.
Help Contents Back << >> WORKING WITH APPLICATION-SPECIFIC SETTINGS You may wish to have different tool settings for a particular application. The APPLICATION LIST lets you customize your Graphire2 tablet and tool settings for individual applications. The APPLICATION LIST displays icons for applications with customized settings. The TOOL LIST displays icons for tools that are customized for the above selected application. Tab settings apply only to the selected tool and application.
Help Contents Back << >> If application-specific settings have not been created, a single icon labeled ALL APPLICATIONS is displayed in the APPLICATION LIST, and the tool settings displayed in the tabs are applied to all applications. When a second application is added to the APPLICATION LIST, the ALL APPLICATIONS icon changes to ALL OTHER APPS, and a new icon is displayed for the new application settings.
Help Contents Back << >> CREATING AN APPLICATION-SPECIFIC SETTING To create an application-specific setting, click on the ADD APPLICATION TO LIST... button or select APPLICATIONS FOR CUSTOM SETTINGS... from the ADD pull-down menu. The ADD APPLICATION FOR CUSTOM SETTINGS dialog box appears. Select an application to add to the APPLICATION LIST. Only applications that are currently running and that have not previously been added to the APPLICATION LIST are displayed.
Help Contents Back << >> If you have used both the Graphire2 Pen and Cordless Mouse on the tablet, the ADD TOOL TO APPLICATION dialog box is displayed. Choose one or both tools to add to the TOOL LIST for this application. By default, the tool in your hand is selected. Click OK to confirm your selection. Lists the tools that can be customized. Note: If a tool is not selected it will continue to work with the settings specified for ALL OTHER APPS.
Help Contents Back << >> ADDING A TOOL TO AN APPLICATION’S TOOL LIST To add a tool to an application’s TOOL LIST, click on the ADD TOOL TO LIST... button or select TOOL TO CUSTOMIZE... from the ADD pull-down menu. The ADD TOOL TO CUSTOMIZE dialog box appears. Choose the application and tool to create settings for. Click OK to confirm your selection. The dialog box will close, and the tool will appear in the TOOL LIST for the chosen application.
Help Contents Back << >> CHANGING SETTINGS FOR A SPECIFIC APPLICATION AND TOOL To change settings for a specific application and tool combination, from the APPLICATION LIST choose the application you want to change tool settings for. From the TOOL LIST, choose the tool you want to customize. Change the tab settings for the selected application and tool combination. REMOVING APPLICATION-SPECIFIC SETTINGS To remove application-specific settings: 1.
Help Contents Back << >> PULL-DOWN MENUS Use the pull-down menus to access additional custom settings options, a language selection menu, and online documentation. Help is available for most dialog boxes that appear when you make a menu selection—just click on the dialog box button for detailed information on settings and options. FILE The File menu contains the following options: • • • SUMMARY.... Provides a summary of your current settings. CLOSE. Closes the control panel and saves any changes.
Help Contents Back << >> ADD The ADD menu contains the following options: • • • TABLET.... Opens a dialog box where you can add one or more tablets. APPLICATION FOR CUSTOM SETTINGS.... Opens a dialog box where you can add an application to the APPLICATION LIST. This is also accessed by clicking on the ADD APPLICATION TO LIST... button. Refer to Working with Application-Specific Settings for more information. TOOL TO CUSTOMIZE....
Help Contents Back << >> LANGUAGE The LANGUAGE menu allows you to switch between English and other installed languages. Typically, the language of the operating system is installed when you install the driver, but other languages can be specified during a custom install. HELP The HELP menu contains the following options: • • • • HELP.... Displays online Help. USER’S MANUAL.... Displays the Graphire2 User’s Manual for Macintosh. GETTING STARTED.... Displays an overview of the control panel.
Help Contents Back << >> ADVANCED TIP PRESSURE SETTINGS To customize advanced tip pressure settings, from the TIP FEEL tab select MORE OPTIONS. The advanced options enable you to change the click pressure and pressure curve settings independently. (In the basic options display, these settings are adjusted simultaneously with the TIP PRESSURE FEEL slider.) Important: The TIP PRESSURE FEEL slider overrides the advanced pressure settings.
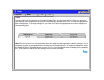
Help Contents Back << >> CLICK FORCE ADJUSTMENT The click force setting adjusts the amount of force required to generate a button click. The CLICK FORCE bar graphically displays the force level at which a click occurs. Enter a value from 1 to 50% or drag the CLICK FORCE bar to set the force at which a click occurs. Note: For optimal performance in graphics applications, set the click force and minimum tip force to the same value.
Help Contents Back << >> PRESSURE CURVE ADJUSTMENT Changing the shape of the pressure curve will change the feel of the pen tip. A pressure curve that increases quickly makes the tip feel more sensitive to changes in force. The control points at each end of the pressure curve set the minimum and maximum amount of force your pen will respond to. If you have a soft touch and want to achieve full pressure without having to apply full force to your pen, decrease the maximum force level.
Help Contents Back << >> To automatically set the maximum force for the way you draw, click the START OVER button and draw in the scratch pad area. As you draw, the MAXIMUM TIP FORCE control moves, and the value in the edit box changes to reflect the peak pressure registered by your hand movements. To start over, click the START OVER button and begin a new drawing. While applying normal pressure to the pen tip, draw several strokes here to automatically set the maximum force value.
Help Contents Back << >> ADVANCED ERASER PRESSURE SETTINGS To customize advanced eraser pressure settings, select the ERASER FEEL tab and click on the MORE OPTIONS button. You work with the advanced eraser settings in the same manner as with the Advanced Tip Pressure Settings. Important: The ERASER PRESSURE FEEL slider overrides the advanced pressure settings. If you customize advanced settings, then drag the ERASER PRESSURE FEEL slider, your advanced settings will be removed.
Help Contents Back << COPYING SETTINGS To copy settings between tools or to another application, choose the COPY SETTINGS TO... option from the EDIT menu or click on the COPY SETTINGS TO... button. A dialog box is displayed where you can copy settings from one tool to another within the same application or between different applications. Note: If you copy settings between the Graphire2 Pen and Cordless Mouse, only those settings common to both tools (such as mapping settings) can be copied.