Operator's manual Electric hammer EH 6, EHB 7 November 2008 0217536en / 001
Contents EH 6, EHB 7 Contents Foreword .................................................................................................................... 5 2 Introduction ............................................................................................................... 6 2.1 Means of representation for this operator's manual ........................................... 6 2.2 Wacker Neuson representative .......................................................................... 7 2.
Contents EH 6, EHB 7 7 Operation ................................................................................................................. 28 7.1 Prior to starting the machine ............................................................................ 28 7.2 Adjusting the machine ...................................................................................... 29 7.2.1 Operating mode (only EHB 7) .............................................................. 29 7.2.2 Engine speed...........
1 Foreword 1 Foreword This operator's manual contains information and procedures for the safe operation and maintenance of your Wacker Neuson machine. In the interest of your own safety and to prevent accidents, you should carefully read through the safety information, familiarize yourself with it and observe it at all times. This operator's manual is not a manual for extensive maintenance and repair work. Such work should be carried out by Wacker Neuson service or authorized specialists.
2 Introduction 2 EH 6, EHB 7 Introduction 2.1 Means of representation for this operator's manual Warning symbols This operator's manual contains safety imformation of the categories: DANGER, WARNING, CAUTION, NOTICE. They should be followed to prevent danger to life and limb of the operator or damage to equipment and exclude improper service. DANGER This warning notice indicates immediate hazards that result in serious injury or even death. f Danger can be avoided by the following the actions mentioned.
EH 6, EHB 7 2 Introduction Instructions f This symbol indicates there is something for you to do. 1. Numbered instructions indicate that you have to carry out something in a defined sequence. 2.2 This symbol is used for lists. Wacker Neuson representative Depending on your country, your Wacker Neuson representative is your Wacker Neuson service, your Wacker Neuson affiliate or your Wacker Neuson dealer. You can find the addresses in the Internet at www.wackerneuson.com.
2 Introduction 2.
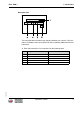
EH 6, EHB 7 2 Introduction Nameplate data The nameplate lists information that uniquely identifies your machine. This information is needed to order spare parts and when requesting additional technical information. f Enter the information of your machine into the following table: Item Designation Type 2 Construction year 3 Machine no. 4 Version no. 5 Item no.
3 Safety information 3 EH 6, EHB 7 Safety information 3.1 Principle State of the art This machine has been constructed with state-of-the-art technology according to the recognized rules of safety. Nevertheless, when used improperly, dangers to the life and limb of the operator or to third persons or damage to the machine or other materials cannot be excluded. Proper use The machine must only be used for the following purposes: To drill holes with a diameter of maximum 90 mm.
EH 6, EHB 7 3 Safety information Operation Operate the machine only as intended and only when in proper working condition. Operate the machine in a safety-conscious manner with all safety devices attached and enabled. Do not modify or disable any safety devices. Before starting operation, check that all control and safety devices are functioning properly. Never operate the machine in a potentially explosive environment.
3 Safety information EH 6, EHB 7 Operator's manual Always keep the operator's manual near the machine or near the worksite for quick reference. If you have misplaced the operator's manual or require an additional copy, contact your Wacker Neuson representative or download it from the Internet (www.wackerneuson.com). Always hand over this operator's manual to other operators or to the future owner of the machine.
EH 6, EHB 7 3.2 3 Safety information Qualification of the operating personnel Operator qualifications Only trained personnel are permitted to start and operate the machine. The following rules also apply: You are physically and mentally fit. You have received instruction on how to independently use the machine. You have received instruction in the proper use of the machine. You are familiar with required safety devices.
3 Safety information EH 6, EHB 7 Personal protective gear Wear personal protective gear to avoid injuries or health hazards: Non-skid, hard-toed shoes. Work gloves made of durable material. Overalls made of durable material. Hard hat. Ear protection. Face protection (optional). Eye protection. Breathing protection in the case of dusty ambient air (optional). Ear protection This machine generates noise that exceeds the country-specific permissible noise levels (individual rating level).
EH 6, EHB 7 3.5 3 Safety information Operating safety Work environment Familiarize yourself with your work environment before you start work. This includes e.g. the following items: Obstacles in the work and traffic area. Load-carrying capacity of the ground. The measures needed to cordon off the construction site from public traffic. The measures needed to secure walls and ceilings. Options available in the event of an accident.
3 Safety information EH 6, EHB 7 Caution with toxic materials Some materials may contain toxic chemicals which are released during demolition. Therefore personal protective equipment must be worn to prevent inhalation of and skin contact with work dust. Do not direct towards people Do not direct the machine towards people in the vicinity during oepration. The tool might be flung out and cause serious injuries.
EH 6, EHB 7 3 Safety information Safe working with the hammer Keep the tool holder closed during operation. Guide the power cable always from the machine to the rear and keep it away from the working range of the machine. 3.7 Safety during the operation of electric appliances Specific regulations for electrical appliances Observe the safety information provided in the brochure General Safety Rules which is included in the scope of delivery of your machine.
3 Safety information EH 6, EHB 7 Extension cable The machine may only be operated with undamaged extension cables! Only use extension cables with grounded conductor and correct connection of the grounded conductor to the plug and coupling (only for machines of class rating I). Only use extension cables which are suitable for use at construction sites: Average rubber hose H05RN-F or better – Wacker Neuson recommends H07RN-F or a country-specific equivalent design.
EH 6, EHB 7 3.9 3 Safety information Safety labels Item Label Description Read the operator's manual.
4 Scope of delivery 4 EH 6, EHB 7 Scope of delivery 4.
EH 6, EHB 7 4.
5 Description 5 EH 6, EHB 7 Description 5.1 Application EH 6 A wide selection of easily interchangeable tools makes this machine suitable for breaking, chiseling, digging, puddling, hammering, ramming and deburring tasks. The machine is suited for processing natural as well as synthetic stone and asphalt and any type of masonry and concrete. EHB 7 The wide selection of easily replaced tools makes it possible to drill holes with a diameter up to max.
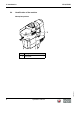
EH 6, EHB 7 5.3 5 Description Components and operator's controls Item Designation 1 Tool holder 2 Ventilation slot 3 Changeover switch 4 Vibration reduction 5 ON/OFF switch 6 Control lamp 7 Service light 8 Slide switch for pre-selecting speed 9 Power cable with plug 10 Supplementary handle 11 Adjustable depth gauge (only EHB 7) Tool holder Version 001 The tool holder is used to hold the tool.
5 Description EH 6, EHB 7 Changeover switch The changeover switch has 2 or 3 operating mode positions depending on machine. The symbol in the viewing window of the changeover switch identifies the selected operating mode. Chiseling Hammer drilling (only EHB 7) Positioning While in operating mode "Positioning," it is possible to turn a flat chisel by hand to achieve the correct working position. Vibration reduction The severity of the vibrations are reduced with the vibration reducer.
EH 6, EHB 7 5 Description Control lamp The control lamp lights up green as soon as the machine is connected to the electric power supply. Slide switch for pre-selecting speed Use the slide switch for the speed pre-selection to set the engine speed. Two speeds are available. Reducing the speed while chiseling operating diminishes the percussion forces as required for removing tiles, for example. Service light The service light lights up red shortly before a carbon brush reaches the wearing limit.
5 Description EH 6, EHB 7 Supplementary handle for EHB 7 Item Designation 1 Clamping piece 2 Radial handle 3 Strap The supplementary handle ensures a safe work position and reduces operator fatigue. The entire supplemental handle can be swiveled variably by 360°. Adjustable depth gauge (only EHB 7) Version 001 The depth gauge enables the variable adjustment of the drilling depth.
EH 6, EHB 7 6 6 Transport Transport Transporting the machine The machine must be transported in the carrying case supplied. 1. Pull the mains plug from the socket. 2. Remove tool. 3. Remove supplementary handle. 4. Place the machine in the carrying case. 5. Wind up the power cable and place in the carrying case. Note: Do not kink the power cable! 6. Store the tools in the carrying case. 7. Place the carrying case on or into a suitable means of transport. Version 001 8.
7 Operation 7 EH 6, EHB 7 Operation WARNING Improper handling can result in injury or serious material damage. f Read and follow all safety instructions of this operator's manual, see chapter Safety information. WARNING Electrical voltage. Injuries from electrocution. f Remove the plug from the plug receptacle before all work on the machine. 7.1 Prior to starting the machine After unpacking, the machine is ready for operation. Checking the machine f Check the machine and all components for damages.
EH 6, EHB 7 7 Operation 7.2 Adjusting the machine 7.2.1 Operating mode (only EHB 7) Selecting the operating mode WARNING Danger of injury with uncontrolled start up of the machine during switching. f Actuate changeover switch only when machine is inactivated and has come to a complete standstill. Item 1 Designation Changeover switch Check position of changeover switch.
7 Operation 7.2.2 EH 6, EHB 7 Engine speed Setting the engine speed Item 1 Designation Slide switch for pre-selecting speed Use the slide switch to adjust the engine speed: f Press slide switch for pre-selecting the speed towards rear (small symbol) to reduce engine speed. Version 001 f Press slide switch for pre-selecting the speed towards front (large symbol) to increase engine speed.
EH 6, EHB 7 7.2.3 7 Operation Supplementary handle for EH 6 Only operate the machine with the supplementary handle. Swiveling the supplementary handle Item 1 Designation Toggle nut 1. Loosen the toggle nut by turning counterclockwise until the supplementary handle can be swiveled. 2. Swivel supplementary handle to desired position. Version 001 3. Tighten the toggle nut by turning clockwise.
7 Operation EH 6, EHB 7 Swiveling the D-shaped handle Item Designation 1 D-shaped handle 2 Toggle nut 3 Gearing 1. Loosen the toggle nut by turning counterclockwise until the gearing is loosened. 2. Swivel D-shaped handle to desired position and allow gearing to snap into place. Version 001 3. Tighten the toggle nut by turning clockwise.
EH 6, EHB 7 7.2.4 7 Operation Supplementary handle for EHB 7 Only operate the machine with the supplementary handle. Swiveling the supplementary handle Item 1 Designation Radial handle 1. Loosen the radial handle by turning counterclockwise until the supplementary handle can be swiveled. 2. Swivel supplementary handle to desired position. Version 001 3. Tighten the radial handle by turning clockwise.
7 Operation 7.2.5 EH 6, EHB 7 Adjustable depth gauge (only EHB 7) Adjusting the depth gauge NOTICE Slipping of the adjustable depth gauge can result in incorrect borehole depths. f Always insert adjustable depth gauge into clamp with the grooved side pointing up. Item Designation 1 Adjustable depth gauge 2 Clamping piece 1. Press clamping piece. 2. Adjust depth gauge as needed by pulling out or pushing in. Version 001 3. Release clamping piece.
EH 6, EHB 7 7.3 7 Operation Changing tools Safety instructions You can change the tool without additional tools. Notes on using tools Only use tools with the following properties: The tool end must be undamaged. The tool must be sufficiently sharp to avoid impact damage. The tool must be suitable for the intended application. Inserting tool Item Designation 1 Tool 2 Tool holder 1. Clean tool end. 2. Grease tool end. 3. Insert tool into tool holder. 4.
7 Operation EH 6, EHB 7 Removing tool Item Designation 1 Tool 2 Locking sleeve 1. Slide locking sleeve towards rear and hold on to it. Lock is released. 2. Remove tool from tool holder by pulling forward. Version 001 3. Release locking sleeve.
EH 6, EHB 7 7.4 7 Operation Starting up Connecting the machine to the power supply The machine may only be connected to AC single phase, connection values see chapter Technical Data. NOTICE Electrical voltage. Incorrect voltage can cause damage on the machine. f Check if the voltage of the current source corresponds with the information of the machine, see chapter Technical Data. WARNING Electrical voltage. Injuries from electrocution. f Check power cable and extension cable for signs of damage. 1.
7 Operation 7.5 EH 6, EHB 7 Operating the machine Switching on the machine WARNING Injuries from insufficiently guided or uncontrolled machine. f Always hold machine with both hands and stand firmly. Item Designation 1 Lock button 2 ON/OFF switch 1. Set machine at working position. 2. Press the ON/OFF switch. Activating continuous operation (only EH 6) 1. Press and hold ON/OFF switch. 2. Additionally press lock button. Deactivating continuous operation (only EH 6) f Press the ON/OFF switch.
EH 6, EHB 7 7.6 7 Operation Vibration reduction CAUTION Too little spring travel at handle. Injuries due to too severe kickback. f Do not press machine all the way up to the stop of the vibration reduction and against the area you wish to work on. NOTICE Uncontrolled kickback. Damages due to slipping tool or tool breaking to the left or right. f Press machine more heavily against the area you wish to work on.
7 Operation 7.7 EH 6, EHB 7 Decomissioning Switching off the machine 1. Release or press again and release the ON/OFF switch. 2. Wait until the machine has come to a complete standstill. 3. Set down the machine in such a way that it cannot tilt, fall or slip. Version 001 4. Pull the plug from the plug receptacle.
EH 6, EHB 7 8 8 Maintenance Maintenance WARNING Improper handling can result in injury or serious material damage. f Read and follow all safety instructions of this operator's manual, see chapter Safety information. 8.1 Maintenance schedule Task Daily before operation Check power cable for perfect condition – if power cable is defective, have it replaced. * Visual inspection of all parts for damage. Clean the machine.
8 Maintenance 8.2 EH 6, EHB 7 Maintenance work WARNING Electrical voltage. Injuries from electrocution. f Remove the plug from the plug receptacle before all work on the machine. Working in the workshop Perform maintenance work in a workshop on a workbench. This has the following benefits: Protection of the machine of contamination on the construction site. A level and clean work surface makes work easier. There is a better overview over small parts and they are not lost as easily.
EH 6, EHB 7 8 Maintenance Checking the tool holder for wear Item Value A 200 mm B Max. 6 mm 1. Insert the tool. Note: Use a new tool to measure only the wear of the tool holder and not the wear of the tool. 2. Measure the tool play 200 mm from insertion point. Play may amount to max. 6 mm. Version 001 If the play exceeds 6 mm, the tool holder must be replaced.
9 Troubleshooting 9 EH 6, EHB 7 Troubleshooting Please refer to the following table if the machine does not work properly. It contains potential faults, their causes and remedies. Malfunction Cause Remedy Machine not in operation Power cable interrupted. Check power cable, have it replaced if defective. * Rotor defective. Have rotor replaced. * Ice formation due to very low temperatures. Allow machine to warm up in warm environment (e.g. heated rooms). Seizing of moveable parts.
EH 6, EHB 7 10 Disposal 10 Disposal Dispose the machine and packaging through environmentally friendly recycling. During disposal observe the regional rules and regulations, e.g. the European Directive for obsolete electrical and electronic devices. Version 001 Do not dispose of the machine in household rubbish. It must be disposed of separately.
11 Accessories EH 6, EHB 7 11 Accessories There is a wide range of accessories available for the machine. Version 001 For more information on the individual accessories, visit the following website: www.wackerneuson.com.
EH 6, EHB 7 12 Technical data 12 Technical data 12.1 EH 6/EHB 7 - 230 Designation Unit Item no. EH 6 M EHB 7 M 0610304 0610303 Length x Width x Height mm (in) 473 x 109 x 293 (18.6 x 4.3 x 11.5) Weight kg (lb) 7.1 (15.7) Rated voltage V 220-240 1~ Rated frequency Hz 50 Rated power consumption W 1,300 Rated current consumption A 7 Percussion rate electronically adjustable rpm Drill speed rpm Single stroke energy J 7.3 (16.
12 Technical data EH 6, EHB 7 Designation Unit EH 6 M EHB 7 M Total vibration value of the acceleration ahv **** m/s2 11.5 9 (chiseling) 13 (hammer drilling in concrete) Uncertainty K m/s2 1.9 1.9 (chiseling) 1.5 (hammer drilling) * According to DIN EN 61140, description see 12.5 Notes regarding class rating (page 51). ** Determined acc. to 2000/14/EC at ear of operator. *** Determined according to 2000/14/EC. **** According to EN 60745. 12.2 EH 6/EHB 7 - 115 Designation Unit Item no.
EH 6, EHB 7 12 Technical data Designation Unit EH 6 M EHB 7 M Sound pressure level LPA **** dB(A) - 96 Uncertainty K dB(A) - 3 Sound power level LWA **** dB(A) - 107 Uncertainty K dB(A) - 3 Total vibration value of the acceleration ahv **** m/s2 11.5 9 (chiseling) 13 (hammer drilling in concrete) Uncertainty K m/s2 1.9 1.9 (chiseling) 1.5 (hammer drilling) * According to DIN EN 61140, description see 12.5 Notes regarding class rating (page 51). ** Determined acc.
12 Technical data EH 6, EHB 7 Designation Unit EH 6 M Drive EHB 7 M Universal electric motor with protective insulation Class rating * II Sound pressure level LPA ** dB(A) 91 - Sound power level LWA *** dB(A) 101 - Sound pressure level LPA **** dB(A) - 96 Uncertainty K dB(A) - 3 Sound power level LWA **** dB(A) - 107 Uncertainty K dB(A) - 3 Total vibration value of the acceleration ahv **** m/s2 11.5 9 (chiseling) 13 (hammer drilling in concrete) Uncertainty K m/s2 1.
EH 6, EHB 7 12.4 12 Technical data Notes regarding the level of exposure to vibrations The vibration emission level given in this Operator´s manual has been measured in accordance with a standardised test given in EN 60745 and may be used to compare one tool with another. It may be used for a preliminary assessment of exposure. The declared vibration emission level represents the main applications of the tool.
12 Technical data 12.6 EH 6, EHB 7 Extension cable A permitted extension cable must fulfill the following criteria: The extension cable must be undamaged. The extension cable has to be connected correctly on plug and bushing. The extension cable has to be suitable for use at construction sites: Average rubber hose H05RN-F or better – Wacker Neuson recommends H07RN-F or a country-specific equivalent design. The extension cable must have been checked by a qualified electrician.
EH 6, EHB 7 12 Technical data Example You utilize an EHB 7 M/230 and want to use an extension cable with a length of 50 m (164 ft). The machine has an input voltage of 230 V. Version 001 According to the table, the extension cable must feature a cross-section area of 1.5 mm2 (AWG 16).
EH 6, EHB 7 Version 001 12 Technical data 54 Operator's manual
EC Declaration of Conformity Manufacturer Wacker Construction Equipment AG Preußenstraße 41 D-80809 München Product Type EH 6 M Product type EHB 7 M Demolition/rotary hammer Item number 0610304, 0610306, 0610308 0610303, 0610307, 0610309 Weight [kg] 7.1 7.3 Measured sound power level dB(A) 101 — Guaranteed sound power level dB(A) 104 — Conformity assessment procedure acc.
DIN EN ISO 9001 Certificate Prüf- und Zertifizierungsinstitut VERBAND DER ELEKTROTECHNIK ELEKTRONIK INFORMATIONSTECHNIK e.V. CERTIFICATE Registration-Number: 6236/QM/06.97 This is to certify that the company Wacker Construction Equipment AG Wacker-Werke GmbH & Co.
Wacker Construction Equipment AG, Preußenstraße 41, 80809 München – Deutschland – Tel.: +49-(0)89-354 02-0 – Fax: +49-(0)89-354 02-390 Wacker Corporation – P.O. Box 9007 – Menomonee Falls, WI 53052-9007 – USA – Tel.: +1(1)262-255-0500 – Fax: +1(1)262-255-0550 – Support: 800-770-0957 Wacker Machinery (HK) Ltd.– Skyline Tower, Suite 2303, 23/F – 39 Wang Kwong Road, Kowloon Bay – Hong Kong – Tel.