CIRCULAR SAW INSTRUCTION MANUAL Item#3729 MODEL NO: PCSD180T PLEASE READ THESE INSTRUCTIONS CAREFULLY TO ENSURE THE SAFE AND EFFECTIVE USE OF THIS TOOL
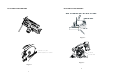
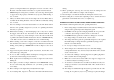
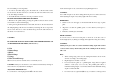
FUNCTIONAL DESCRIPTION FUNCTIONAL DESCRIPTION Figure 2 CLOCKWISE TO LOOSEN COUNTER CLOCKWISE TO TIGHTEN SWING NUT CUTTING DEPTH Figure-3 Figure-1 2 1
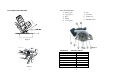
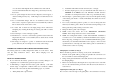
LIST OF MAIN PARTS 1) Battery pack 2) Upper guard 3) Base 4) Flange 5) Lower guard FUNCTIONAL DESCRIPTION 6) Nut 7) Saw blade 8) Switch lock 9) ON/OFF switch Figure-4 CLAMP NUT Figure 6 Figure-5 3 TECHNICAL SPECIFICATIONS: Description PCSD180T Rating Voltage 18Volts Nominal power 200W No-load speed 2500min Saw blade Ø6.49×Ø 0.39inch Cutting depth at 90˚ 0-2.00inch Cutting depth at 45˚ 0-1.50inch Weight 7.
3. Keep bystanders, children and visitors away while operating a power tool. Distractions can cause you to lose control. ELECTRICAL SAFETY 1. Do not abuse the cord. Never use the cord to carry the tool. Keep cord away from heat, oil, sharp edges or moving parts. Replace damaged cords immediately. Damaged cords may create a risk of fire. 2. A battery operated tool with integral batteries or a separate pack must be recharged only with the specified charger for the battery.
situations. 6. Use safety equipment. Always wear eye protection. Dust mask, non-skid safety shoes, hard hat, or hearing protection must be used for appropriate conditions. TOOL USE AND CARE 1. Use clamps or other practical way to secure and support the workpiece to a stable platform. Holding the work by hand or against your body is unstable and may lead to loss of control. 2. Do not force tool. Use the correct tool for your application.
7. 8. 9. 10. 11. 12. 13. 14. 15. 16. 17. guard is covering the blade before placing the saw down on bench or floor. Be aware of the time it takes for the blade to stop after switch is released. NEVER hold piece being cut in your hand or across the legs. It is important to support the work properly to minimize body exposure, blade binding, or loss of control. Always use blades with correct size and shape arbor holes.
11. 12. 13. 14. 15. 16. on a soft surface that might block the ventilation slots and result in excessive internal heat. Place the charger in a position away from any heat source. Do not operate charger if it has received a sharp blow, been dropped, or otherwise damaged in any way. Take charger to an authorized service center. Do not disassemble charger, take it to an authorized service center when service or repair is required.
use the correction screw. 3. Hold the tool firmly by both handles and work applying light pressure. Adjusting the Cutting depth (See Fig.3&4) For the cleanest possible cut, set the cutting depth whenever possible 5 mm deeper than the thickness of the material. Slacken the swing nut for adjusting depth of cut, set the cutting depth, and tighten the swing nut again.
2) Insert the battery pack into the charger, as shown in Fig 7, making sure the pack is fully seated in the charger. The red light indicator will illuminate showing that the battery is being charged. 3) When charging is well done green light will illuminate. The minimum charge time is normally 1hour after which the battery should be removed. IMPORTANT CHARGING NOTES Longest life and best performance can be obtained if the battery pack is charged when the air temperature is between 65ºF - 75ºF.
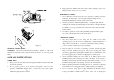
before installing or removing blade. 1. To remove the blade (Fig.8, press the shaft lock so that the blade cannot revolve and use the hex wrench to loosen the bolt clock-wise. Then remove the bolt, outer flange and blade. 2. To install the blade, follow the removal procedure in reverse. BE SURE TO TIGHTEN THE BOLT SECURELY 3. Hold the work spindle still by pressing the spindle lock down and loosen the screw. Remove washer and clamping. 4.
ridge. To avoid a tearing out of the cutting edges when working sensitive area (if the surface is very smooth crepe tape also enables easy drawing of line), fixing a thin board of wood to the workpiece and sawing through both will also avoid tearing out effectively. ADJUSTING FOR ACCURACY OF 90º CUT (VERTICAL) This adjustment has been made by the manufacturer. But if it is off, adjust the adjusting screw with a screwdriver while squaring the blade with the base triangular rule, try-square, etc.
Both brushes should be replaced at the same time. Use only identical carbon brushes. Use a screwdriver to remove the brush holder caps. Take out the worn carbon brushes, insert the new ones and secure the brush holder caps. Thank you for purchasing a top quality KingCraft product. This Cordless Circular Saw item #3729 was tested and meets our stringent quality standards.