
Instruction manual


AFTER SALES SUPPORT 1 888 367 7373 customer-service@wk-usa.com 03-12-14 / KB-8085
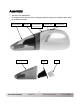
How to Use the Wet/Dry Vac
1. Make sure the Wet/Dry Vac is turned off and placed securely in the charging base.
2. Plug the power cord into a power outlet and allow the unit to fully charge for 12 hours
the first time. Please note that subsequent charging times will vary depending on how
long the Wet/Dry Vac was used.
3. The charging indicator light will glow red when the unit is on the charging base and
the charging base is plugged in. When the light turns off it is fully charged. The
charging base can also be used to store the crevice tool and the brush.
4. After the unit is fully charged, unplug the charging base and remove the Wet/Dry Vac
from the base.
5. Securely attach any of the tools (if needed) and press the On/Off button.
6. When you are through with the Wet/Dry Vac, press the On/Off button, remove the
attachments. Please remember to only use the liquid nozzle when vacuuming up small
amounts of liquids.
7. Point the unit with the opening in a downward position and take it to a trash can or a
sink if liquids have been picked up.
8. Press the dust container release button (see page 6), pull out the filter and the divider
(see page 6), and empty the dust container into the trash or the sink if it contains
liquids.
9. Rinse the dust container with clean water and let it dry thoroughly before snapping it
back onto the unit.
7
1
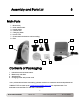
Getting Started
7