
Installation & Assembly


WAC Lighting
www.waclighting.com
Phone (800) 526.2588 • Fax (800) 526.2585
Headquarters/Eastern Distribution Center
44 Harbor Park Drive • Port Washington, NY 11050
Phone (516) 515.5000 • Fax (516) 515.5050
Western Distribution Center
1750 Archibald Ave • Ontario, CA 91761
Phone (800) 526.2588 • Fax (800) 526.2585
WAC Lighting retains the right to modify the design of our products at any time as part of the company's continuous improvement program. JULY, 2014
MOUNTING TRACK
1. Raise track assembly to ceiling. Mark mounting
hole locations.
2. Drill holes suitable for the fasteners you intend to use
at marked mounting locations. Toggle wings
(supplied) require ½ inch holes.
3. Insert toggle wings through holes. Screw bolts
(supplied) into toggle wings 2 or 3 turns .
4. Push toggle wings into holes. Do not tighten toggle
bolts until all electrical connections are made.
FIXTURE INSTALLATION
Circuit no.1 ( lower circuit )
1. Insert xture into the track.
2. Rotate adapter 90° till arrow points to polarity
line on the track.
Circuit no.2 ( upper circuit )
1. Pull the copper tab marked “P” with a screw driver..
2. Insert the plastic clip supplied under
the copper tab marked “P”.
3. Insert xture into the track.
4. Rotate adapter 90° till arrow points to
polarity line on the track.
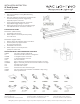
OTHER TWO CIRCUIT TRACK CONNECTORS AVAILABLE:
J2-BXLE Live end for straight conduit feed.
J2-I Connects two track sections in a straight line.
J2-IPWR “I” straight line power connector.
J2-IDEC “I” dead end straight connector.
J2-LE Live end connector.
J2-LLEFT Left “L” connector, joins two track sections to make a 90º angle.
J2-LRIGHT Right “L” connector, joins two track sections to make a 90º angle.
J2-T Joins three track sections.
J2-X Joins four track sections.
J2-FLX Connects two tracks at variable angles.
J2-TBLE Live end connector for installation on T-BAR for a drop ceiling.
J2-UCP Covers a junction box.
INSTALLATION INSTRUCTION
J2 Track Systems
J2-T4, J2-T8, J2-T12