
Installation & Assembly


WAC Lighting
www.waclighting.com
Phone (800) 526.2588 • Fax (800) 526.2585
Headquarters/Eastern Distribution Center
44 Harbor Park Drive • Port Washington, NY 11050
Phone (516) 515.5000 • Fax (516) 515.5050
Western Distribution Center
1750 Archibald Ave • Ontario, CA 91761
Phone (800) 526.2588 • Fax (800) 526.2585
WAC Lighting retains the right to modify the design of our products at any time as part of the company's continuous improvement program. JULY, 2014
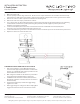
3. Make a ush cut through track with a ne-toothed hacksaw. File any rough edges or ash. Brush out any remaining lings.
Insert end cap and secure the screw. This completes eld-shortening procedure. If you wish to connect track to
other connectors such as an “L”, “T”, or “I” continue with step 4 below.
4. Note: The nished ends of track have grooves cut in the center section to allow clearance for the stop in the mating
connector. It is necessary to reproduce this groove if the track is to be mated to another connector. Note dimensions
of the groove below, mark track with a pencil and use a hack saw to cut two lines in the aluminum.
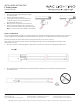
Break out the tab and le the edges. Thoroughly brush away metal lings.
The groove in the end of track allows clearance for the stops on the connector.
Assembled
Retain instructions for future reference
INSTALLATION INSTRUCTION
L Track Systems
LT2, LT4, LT6, LT8