
Installation Sheet

WAC Lighting
www.waclighting.com
Phone (800) 526.2588 • Fax (800) 526.2585
Headquarters/Eastern Distribution Center
44 Harbor Park Drive • Port Washington, NY 11050
Phone (516) 515.5000 • Fax (516) 515.5050
Western Distribution Center
1750 Archibald Ave • Ontario, CA 91761
Phone (800) 526.2588 • Fax (800) 526.2585
WAC Lighting retains the right to modify the design of our products at any time as part of the company's continuous improvement program. DECEMBER 2019
2
INSTALLATION INSTRUCTION
FM-200111 , FM-200115, FM-200118
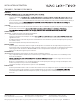
FIG 1
Fixture Wires
Black (To Switch)
Fixture Wires
White
Fixture Wires
Green (Ground)
House Wires
Dimmer / Switch
House Wires
White (Neutral)
House Wires
Green or Bare Copper
(Ground)
FIG 2 - Wiring
PREPARATION
MOUNTING & WIRING THE FIXTURE
3.
4.
5.
6.
7.
8.
9.
10.
11.
electrical
box
(by others)
Base Plate
Junction Box Screw
Diffuser & Trim
Black (To Hot)
Continuous Power
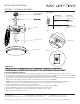
FIG 3
Remove the diffuser and trim from the base plate by loosening the side screws and twisting the trim counter-clockwise.
On the base plate, rotate the 2 tension clips and swing the LED Board downward to reveal the rest of the electronics (See FIG. 3).
Secure the base plate to the junction box using the junction box screws provided (See FIG. 1).
To guarantee a secure installation, fasten additional screws with mounting anchors at screw hole locations to mounting surface.
Pull input wires through the wiring hole and connect fixture wires to house wires (See FIG. 2).
NOTE:
For Emergency Battery Backup (EM) versions, please connect black wire labeled "To Switch" to your dimmer or
on/off switch. Connect "To Hot (Continuous Main Power)" directly to your building's continuous input wire.
For the non-EM fixtures, there will be single black input wire.
Select the desired Color Temperature by setting the sliding switch to the target CCT (See FIG. 4)
Rotating Clip
Swing the LED surface back to its original position and secure it with the tension clips.
2700K
3000K
3500K
4000K
5000K
FIG 4
Reattach the trim and diffuser to the rest of the fixture and tighten the side screws.
Turn power back on to finish installation.