
Installation Guide

INSTRUCTIONS: LED Bar Lights
Models Series: BA-LED2 BA-LED4 BA-LED6 BA-LED8 BA-LED10
CAUTION:
Read all instructions before installing.
Always turn off power at fuse box prior to installation to prevent electrical shock.
For display wall or under cabinet only. Not intended for ceiling use.
For installation by a qualified electrician.
System is intended for installation in accordance with National Electric Code, and local regulations.
Consult with local inspector to assure compliance.
Keep away from combustible materials such as plastic or paper products.
Do not operate with missing or damaged lens.
All wires must be contained.
Wiring and Installation:
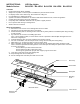
1. Remove the cover screws on the LED light bars and set it aside.
2. Carefully pry open the back plate with a screw driver.
3. Position the back plate on mounting surface and mark key holes positions. Install back plate using mounting
screws provided.
4. Pry out knock out on fixture for installing input wires.
On 4, 6, 8,and 10 light models, a second knock out hole is provided to allow multiple LED light bars to be
wired from a single input.
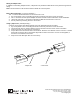
5. Install the Romex® / BX connector provided to the knocked out hole.
6. For ease of installation, use wire loop on fixture to hang onto the back plate during wiring.
7. Allow approx 1 ½” of 120v input wires to enter the fixture body.
8. Strip ¼” insulation off 120v input wires. Connect input wires to LED light bars using convenient “poke
home” connectors provided with LED light bars. Push 120v input wires firmly into “poke home” connectors
for secure connections.
Connect black input wire to black fixture wire.
Connect white input wire to white fixture wire.
Connect green ground wire (may be bare copper) to green fixture wire.
9. Tuck wires connections neatly into LED light bar.
10. Snap LED light bar onto the back plate.
11. Secure LED light bar onto back place with cover screws.
BA-LED4 shown
Mounting
screw
Back plate
Screw driver
Cover screw
Romex® / BX
connector
Wire loop