
DCAM560C ToF Camera User Manual -20211210

23
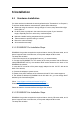
6 Installation
6.1 Hardware Installation
You have read and understood the warnings listed under "Precautions" on Chapter 2;
To achieve reliable distance measurements, please follow below tips:
⚫ Better not using the camera in strong sunlight. If have to, keep the ambient light
below 50k Lux.
⚫ Do NOT place any objects in the scene that are not part of your intended
target, especially mirrors or other shiny surfaces/objects.
⚫ Maintain a stable housing temperature during operation.
⚫ Take measures to provide cooling to camera
⚫ Mount the camera robustly.
⚫ All accessories are ready
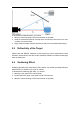
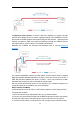
6.1.1 DCAM560C Pro Installation Steps
DCAM560 Lite product transmits the required data to host by Ethernet cable, and it
doesn’t support Power over Ethernet, so the power adaptor shall be used.
The steps are as below:
1. Mount the camera in an appropriate fixture, e.g. a camera bracket;
2. Connect the DCAM560C Pro ToF camera to the host processor with the Ethernet
cable(VZENSE-MFP-10P-A), the standard RJ45 socket locates at the back of the
DCAM560 Lite camera;
3. Insert the DC connector of the power supply adaptor into the 12V DC Jack at the
back of the camera;
4. Connect the adaptor to power source;
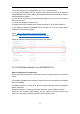
5. Please do set the IP address of the camera and host PC in the same segment;
6. The default IP address of DCAM560 Lite is 192.168.1.101, you can change the IP
address by the VzenseConfigTool;
China:https://gitee.com/Vzense/VzenseConfigTool
Oversea:https://github.com/Vzense/VzenseConfigTool
Please do read the document before reconfigure the camera:
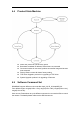
6.1.2 DCAM560C Lite Installation Steps
DCAM560 Lite product transmits the required data to host by Ethernet cable, and it
doesn’t support Power over Ethernet, so the power adaptor shall be used.
The steps are as below: