
User's Manual
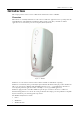
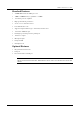

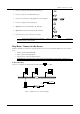
Table Of Contents
- Introduction
- Installation
- Specifications
- Connectors and Cables
- Troubleshooting

Winlinx - Hardware User’s Guide
Specifications 4
Step Three: Connect accessories and power
The connectors for devices supported by Winlinx are located on the rear panel.
Refer to page 10 for details about the connectors and cables.
N
OTE
: B
EFORE CONNECTING ANY CABLE
,
ENSURE THAT THE EXTERNAL POWER SUPPLY IS TURNED
'
OFF
'. T
HE POWER
-
CORD MUST BE CONNECTED ONLY AFTER ALL OTHER CONNECTIONS ARE MADE
.
Follow the instructions below to connect various
accessories
Connector Symbol
(see figure 2)
9
Connect the video cable from your display unit to the video port
9
Connect USB devices to the USB ports
9
Connect external speakers to the 16-Bit stereo output port
9
Connect your microphone to the Microphone input port
Figure 2: Rear panel of Winlinx
PC-card/LCD slot
Kensin
g
ton Lock
PS/2 Mouse
p
ort
Network
p
ort
Video port
USB ports
Stereo line out
PS/2 Keyboard port
Serial port (COM1)
Serial port (COM2)
Parallel port (printer)
Micro
p
hone in
p
ut
DC
p
ower inlet