
User's Manual
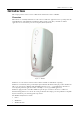

Table Of Contents
- Introduction
- Installation
- Specifications
- Connectors and Cables
- Troubleshooting

Winlinx - Hardware User’s Guide
Specifications 3
Installation
This chapter describes the procedure to install the hardware of Winlinx.
Step One: Unpack
The carton in which Winlinx was shipped to you contains the following:
•
Winlinx
•
Power Adapter
•
Power Cord
•
Mouse
•
CD containing manuals
N
OTE
: P
LEASE RETAIN THE ORIGINAL CARTON AND PACKING MATERIAL
. T
HEY WOULD BE REQUIRED
TO AVOID DAMAGE DURING TRANSIT
(
IF REQUIRED IN FUTURE
).
Step Two: Prepare the site
1.
The site where you want to install Winlinx must have the following:
•
100~240V AC, 5A, 50/60 Hz, 3-pin power outlet
N
OTE
: E
NSURE THAT THE POWER OUTLET IS PROPERLY REGULATED AND EARTHED
. A
FLOATING
CHASSIS IS A POTENTIAL SOURCE FOR ELECTRIC SHOCKS
.
•
Well ventilated, clean, dry and dust free atmosphere
•
Proper operating temperature (
see page 8
)
•
Table or desk of suitable size for placing Winlinx
2.
Place Winlinx on the table or desk, in a location that can provide quick and easy access to the power outlet
in emergencies.
N
OTE
: R
UBBER PADS AFFIXED TO THE BASE OF
W
INLINX ENSURE THAT IT IS STABLE WHEN PLACED ON
THE TABLE OR DESKTOP
. W
INLINX CAN ALSO BE SECURED TO THE TABLETOP OR DESK
. S
EE
S
TEP
F
IVE
:
S
ECURING THE UNIT TO THE DESK OR TABLE
FOR INSTRUCTIONS
.
3. Ensure a minimum space of 4 inches (
10cm
) on all sides of the unit for efficient convection cooling.