
User's Manual
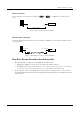
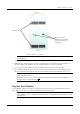

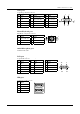
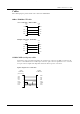
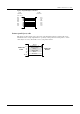
Table Of Contents
- Introduction
- Installation
- Specifications
- Connectors and Cables
- Troubleshooting

Winlinx - Hardware User’s Guide
Specifications 6
Direct connection
Connect an RS232 cross cable from a serial port - or - of Winlinx to a serial port of the
server.
Server
COM
PORT
Winlinx
COM
PORT
RS232C CROSS
Thin Client
Figure 4: Direct Connection through RS232
Dial-in remote connection
Connect an RS232 straight cable from one of the serial ports of Winlinx to a modem that is in turn connected
to a telephone line.
Modem
Server
COM
PORT
COM
PORT
Modem
PSTN
RS232C STRAIGHT
Winlinx
Thin Client
RS232C STRAIGHT
Figure 5: Dial-In Remote Connection through Modem
Step Five: Secure the unit to the desk or table
1.
The following items are required to secure Winlinx to the table or desk.
•
Equipment to drill holes (
of 8mm. diameter
) through your desktop or tabletop.
•
Two M6 pan-head screws (
length=T+14 mm., where T is the thickness of the surface of your desktop
or table. E.g. if your desktop is 20mm thick, the screws should be 20+14=34mm. long
).
2.
The base panel (
see Figure 6
) of Winlinx has two tapped-holes for securing the unit. One of the holes is
closed with a Nylon plug. Lift the unit, hold it upright, pull out the Nylon plug and carefully place the unit
on a flat surface.
1
2