Portable Automatic Satellite System with built-in DVB for positive satellite identification Model VQ2000 Stationary Model VQ3000 In-Motion Operating Instructions ® Digital TV Solutions for Mobile Markets 11200 Hampshire Avenue South, Bloomington, MN 55438-2453 Phone: (800) 982-9920 Fax: (952) 922-8424 www.kingcontrols.
IMPORTANT! The satellite TV market is expanding and changing. The information in this manual was accurate at the time of printing. If your VuQube does not operate as outlined in this manual please call King Controls at (800) 982-9920 or visit our website at www.kingcontrols.com. This VuQube is factory pre-set for DIRECTV® standard digital programming broadcast from the 101° W satellite.
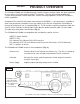
SECTION 1 PRODUCT OVERVIEW The VuQube VQ2000 and VQ3000 Automatic Satellite Systems provide simple, one-touch operation for easy access to all your favorite satellite TV channels. They are full featured portable dish systems with automatic satellite acquisition, satellite switching capabilities and for the VQ3000, inmotion capabilities.
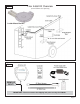
Flex Install Kit Overview Fig. 2 (Flex Install Kit sold separately) Ladder Mount Bracket Fig. 3 REMOVE BOLT! IMPORTANT! You must remove the shipping bolt prior to using the VuQube.
SECTION 2 Fig. 4 VUQUBE CONNECTION DIAGRAM IMPORTANT! You must remove the shipping bolt prior to using the VuQube (Fig. 3). Note: HDTV receivers require HDMI or component video/audio cable connection to TV.
SECTION 3 ANTENNA CONFIGURATION The VuQube Model VQ2000 and VQ3000 Automatic Satellite Systems are factory pre-set for DIRECTV standard digital programming broadcast from the 101° W satellite. If you also receive your local channels from DIRECTV’s 119 satellite or if you subscribe to Dish Network or Bell TV programming, you must use the VuQube hand held controller to re-configure the antenna to work with your satellite service.
STEP 1: SATELLITE SERVICE OPTIONS DIRECTV Single Satellite 101 Receive standard digital programming from the DIRECTV 101 satellite only. DIRECTV Plus: 101, 119 Receive standard digital programming from the 101, and locals from the 119, and automatically switch between the two. IMPORTANT! This VuQube can receive available HDTV programming from DIRECTV Ku band satellites at 101° and 119°. It will not receive channels broadcast from DIRECTV’s Ka band satellites at 99° and 103°.
DISH NETWORK Dish 500 Automatically switch between the 110 and 119 satellites for Dish Network Standard Digital Service by simply changing channels with the receiver’s remote control. Dish HD Eastern Arc Automatically switch between the 61.5 and 72 satellites for Dish Network by simply changing channels with the receiver’s remote control.
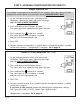
STEP 2: ANTENNA CONFIGURATION FOR DIRECTV Single Satellite 101 The VuQube is factory pre-set for the DIRECTV 101 satellite. Unless the antenna has been configured for another option since leaving the factory, PERFORM STEP 5 ONLY. 1. On the VuQube controller, press and release the ON button. Wait for the status light to flash orange, and then WAIT 4 MORE SECONDS. 2. Press and release the ON button 16 times. The status light starts rapidly flashing green and red. 3. Press and hold the button for 4 seconds.
STEP 2: ANTENNA CONFIGURATION FOR DISH NETWORK DISH 500 (satellites 110, 119) 1. On the VuQube controller, press and release the ON button. Wait for the status light to flash orange, and then WAIT 4 MORE SECONDS. 2. Press and release the ON button 12 times. The status light starts rapidly flashing green and red. 3. Press and hold the button for 4 seconds. The status light will turn orange for 1 second, and then start flashing green or red. 4. Press OFF. 5.
ANTENNA CONFIGURATION FOR DISH NETWORK-continued DISH HD Western Arc with Locals (satellites 110, 119, 129) 1. On the VuQube controller, press and release the ON button. Wait for the status light to flash orange, and then WAIT 4 MORE SECONDS. 2. Press and release the ON button 20 times. The status light starts rapidly flashing green and red. 3. Press and hold the button for 4 seconds. The status light will turn orange for 1 second, and then start flashing green or red. 4. Press OFF. 5.
DISH HD Alternate with Locals (satellites 61.5, 110, 119) 1. On the VuQube controller, press and release the ON button. Wait for the status light to flash orange, and then WAIT 4 MORE SECONDS. 2. Press and release the ON button 16 times. The status light starts rapidly flashing green and red. 3. Press and hold the button for 4 seconds. The status light will turn orange for 1 second, and then start flashing green or red. 4. Press OFF. 5.
STEP 2: ANTENNA CONFIGURATION FOR BELL TV Bell TV Standard Digital (satellite 91) 1. On the VuQube controller, press and release the ON button. Wait for the status light to flash orange, and then WAIT 4 MORE SECONDS. 2. Press and release the ON button 8 times. The status light starts rapidly flashing green and red. 3. Press and hold the button for 4 seconds. The status light will turn orange for 1 second, and then start flashing green or red. 4. Press OFF. 5.
Bell TV HDTV 82/91 Alternate (satellites 82, 91) STATIONARY USE ONLY 1. On the VuQube controller, press and release the ON button. Wait for the status light to flash orange, and then WAIT 4 MORE SECONDS. 2. Press and release the ON button 36 times. The status light starts rapidly flashing green and red. 3. Press and hold the button for 4 seconds. The status light will turn orange for 1 second, and then start flashing green or red. 4. Press OFF. 5.
STEP 3: DISH AND BELL TV CHECK SWITCH PROCEDURE IMPORTANT! YOU MUST HAVE COMPLETED THE ANTENNA CONFIGURATION (PAGE 5), AND PERFORMED A SUCCESSFUL SEARCH (STEP 2 BELOW), BEFORE RUNNING THE CHECK SWITCH (STEP 3 BELOW).
Note: Not all receivers will display a screen with options that include superdish and alternate boxes. 5. Make sure Superdish and Alternate boxes are NOT selected. 6. Highlight Test and press Select. Screen graphics may vary. The unit will perform a check switch test, and the dish will periodically move back and forth. (This process will take several minutes.) 7. When test is complete, a screen similar to one below or on the next page should appear.
Dish HD Alternate with Locals NO “X”s MUST SHOW “SW64” Bell TV 91 “NO SWITCH DETECTED” or “INSTALLED DEVICE UNKNOWN” or similar Bell TV HDTV 82/91 Bell TV HDTV 82/91 Alternate MUST SHOW “SW21” NO “X”s If indicated results are not obtained, go back to Step 3 and run test again. Contact King Controls if the check switch fails to load after 4 attempts. 8. Save the settings, exit to the main menu screen and wait for programming to download. 9.
This page intentionally left blank.
SECTION 4 OPERATION IMPORTANT: There must be a clear “line of sight” to the southern sky. Mountains, buildings, trees, telephone poles, etc. can all block the satellite signal from reaching the dish. The distance driven since last performing a search may affect how long it takes the VuQube to find the satellite. Satellite TV and receiver technology are constantly changing. If you experience difficulty go to www.kingcontrols.com or contact the King Controls Service Department at (800) 982-9920.
AUTOMATIC SATELLITE SWITCHING 1. After you have properly configured the VuQube antenna for your satellite service, the VuQube will automatically switch between satellites by simply selecting your desired channel using the receiver’s remote control. . Note: For better performance when using the automatic satellite switching feature, change channels by selecting your program from the channel guide rather than channel surfing.
DISH NETWORK HDTV: Changing the Satellite Trio Dish HD Western and Eastern Arc with Locals IMPORTANT! Perform this procedure only if you are unable to receive all of your HD programming in a particular area of the country. You cannot use this method to change trios if the antenna has not been initially configured for Dish HD Western Arc with Locals or Dish HD Eastern Arc with Locals (see ANTENNA CONFIGURATION section).
Change to the DISH HD Western Arc Trio (110, 119, 129) 1. On the VuQube controller, press and release the ON button. Wait for the status light to flash orange, and then WAIT 4 MORE SECONDS. 2. Press and release the ON button 4 times. The status light starts rapidly flashing green and red. 3. Press and hold the button for 4 seconds. The status light will turn orange for 1 second, and then start flashing green or red. 4. Press OFF. GO TO PAGE 14 AND RUN THE CHECK SWITCH.
CHANGE STARTING SEARCH ELEVATION If you have traveled a long distance since last performing a search, you can speed up acquisition time by setting the VuQube to start searching at one of four different elevations: 25°, 37°, 48° or 55°. Find your location on the appropriate map for your service and choose the elevation closest to you. Then follow the instructions in the corresponding box on the next 2 pages.
CHANGE SEARCH ELEVATION TO 25° 1. On the VuQube controller, press and release the ON button. Wait for the status light to flash orange, and then WAIT 4 MORE SECONDS. 2. Press and release the ON button 8 times. The status light starts rapidly flashing green and red. 3. Press and hold the ON button for 4 seconds. The status light will turn orange for 1 second, and then start flashing green or red. 4. Press OFF. CHANGE SEARCH ELEVATION TO 37° 1. On the VuQube controller, press and release the ON button.
CHANGE STARTING SEARCH ELEVATION-Continued CHANGE SEARCH ELEVATION TO 48° 1. On the VuQube controller, press and release the ON button. Wait for the status light to flash orange, and then WAIT 4 MORE SECONDS. 2. Press and release the ON button 16 times. The status light starts rapidly flashing green and red. 3. Press and hold the ON button for 4 seconds. The status light will turn orange for 1 second, and then start flashing green or red. 4. Press OFF. CHANGE SEARCH ELEVATION TO 55° 1.
SECTION 5 SYMPTOM TROUBLESHOOTING POSSIBLE REASON COURSE OF ACTION VuQube does not find satellite. (STATUS light flashes red or green.) Did not hold ON button for 3 FULL SECONDS. Hold ON button for 3 FULL SECONDS. STATUS light flashes orange. Before search: bad coax connection. Call King Controls. After unsuccessful search (approximately 25 minutes): obstruction in line of sight between VuQube and satellite. Move vehicle so VuQube has unobstructed view of southern sky.
SECTION 6 SECURITY BRACKET The VuQube can be secured to an object using a padlock and cable (Fig. 5). Fig.
SECTION 7 MAINTENANCE The VuQube Satellite System has been designed to be maintenance and trouble free. For optimum signal strength, keep the enclosure clean from dirt, bugs, and other debris. Periodic washing of the enclosure with mild soap and water is recommended. IMPORTANT! Do not power wash the VuQube. If you plan on not using your VuQube for long periods of time, it is recommended that the system be put through a search procedure on a quarterly basis to keep all moving parts in good working order.
SECTION 8 LIMITED WARRANTY Every new VuQube Satellite System is thoroughly inspected and tested before leaving the factory, and is covered by the following one year parts limited warranty from the date of original purchase: • One year parts warranty: The customer is not responsible for the cost of replacement parts if the original part is determined to be defective under the terms of the warranty. The customer is responsible for the cost of replacement parts after one year.
11200 Hampshire Avenue South, Bloomington, MN 55438-2453 Phone: (800) 982-9920 Fax: (952) 922-8424 www.kingcontrols.