
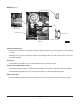
Specifications

– 14 –
PL-41520-1
STEAM
CONTROL
HANDLE
COMPARTMENT SWITCH
COOKING
TIME
CONTROL
DOOR LATCH
TEMPERATURE
SENSOR
PRE-VENT
TM
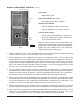
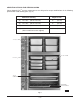
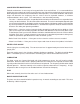
AUTOMATIC COMPARTMENT CONTROLS (Fig. 5) Optional
Door Latch
• Holds door closed.
Door Screw Handle (not shown)
• Seals door gasket against cabinet.
Steam Control Handle
• Pull out and down to open steam valve.
• Push up and back to turn steam valve off.
Cooking Time Control
• Sets the desired cooking time (0 – 60 minutes).
Compartment Switch
• Press top of switch to start the timer.
• At end of cooking cycle, press bottom of switch to silence
buzzer.
Temperature Sensor
• Starts timer when cooking compartment temperature
reaches 175 – 185°F.
Refer to
Steam Cooking with Vulcan Kettles and Steamers
(packed with your steamer) for suggested cooking times. Size,
weight, pan loading and product quality will affect cooking
times and should be adjusted to your own requirements.
Fig. 5
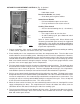
1. Prepare vegetables, fruits, meats, seafood and poultry as you would for steam cooking or cooking
in water (clean, separate, cut, remove stems, etc). Place in pan.
2. Place loaded pans in the compartment and close the compartment door. Turn the door screw
handle clockwise to seal the door gasket. Normal pressure will seal the compartment. However,
a new gasket may require additional pressure after it becomes heated. After the pressure gauge
located under the lower compartment controls reaches a maximum pressure of 5 to 6
psig, turn the
door screw handle clockwise enough to stop the leakage. The pressure gauge indicates steam
pressure in the steam supply pipe, not the compartment.
3. The timer knob must be turned to 10 minutes or beyond to trip the switches. The knob may then
be turned back to a lower setting if a shorter set time is desired.
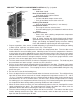
4. Pull the steam control handle forward and lock it by pulling the arm down. The door latch cannot
be opened when the steam control handle is pulled forward. Air is automatically vented from the
compartment as steam enters. The escaping air causes a hissing sound audible during the early
part of the cycle.
5. Set the timer to the desired cooking time.
6. Press the top half of the red switch located under the timer to start the timer. The red light will not
light and the timer will not start until the interior compartment temperature reaches 175 – 185° F
(79 – 85°C). During this automatic pre-vent / defrost period, the drain is open, freely venting any air
and condensate. At 175°F, the drain closes, the timer starts, and the red light comes on. During
the cooking cycle, the compartment will reach 5 to 6 psig. Also, limited venting takes place through
the compartment drain during cooking removing condensate and residual air.
7. When the timer reaches 0 minutes, the arm automatically moves to the rear, shutting off the steam
supply and opening the drain. The compartment will exhaust for about one minute, then the
continuous buzzer will sound, indicating the end of the cooking cycle.
6. Turn the steamer off by pressing the bottom half of the red switch. Then loosen the door screw
handle, allowing moisture to escape. After a few seconds, move the door latch to the left. Then
open the door and remove pans of food.