INSTALLATION & OPERATION MANUAL VHL2G & VHL3G GAS FOOD STEAMERS MODEL VHL2G VHL3G ML-126323 ML-126324 Model VHL2G VULCAN-HART COMPANY, FORM 31179 (Jan. 2001) P.O. BOX 696, LOUISVILLE, KY 40201-0696, TEL. (502) 778-2791 www.vulcanhart.
IMPORTANT FOR YOUR SAFETY THIS MANUAL HAS BEEN PREPARED FOR PERSONNEL QUALIFIED TO INSTALL GAS EQUIPMENT, WHO SHOULD PERFORM THE INITIAL FIELD START-UP AND ADJUSTMENTS OF THE EQUIPMENT COVERED BY THIS MANUAL. POST IN A PROMINENT LOCATION THE INSTRUCTIONS TO BE FOLLOWED IN THE EVENT THE SMELL OF GAS IS DETECTED. THIS INFORMATION CAN BE OBTAINED FROM THE LOCAL GAS SUPPLIER.
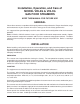
TABLE OF CONTENTS GENERAL . . . . . . . . . . . . . . . . . . . . . . . . . . . . . . . . . . . . . . . . . . . . . . . . . . . . . . . . . . . . 4 INSTALLATION . . . . . . . . . . . . . . . . . . . . . . . . . . . . . . . . . . . . . . . . . . . . . . . . . . . . . . . Unpacking . . . . . . . . . . . . . . . . . . . . . . . . . . . . . . . . . . . . . . . . . . . . . . . . . . . . . . . Location . . . . . . . . . . . . . . . . . . . . . . . . . . . . . . . . . . . . . . . . . . . . . . . . . . . . . . . .
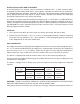
Installation, Operation, and Care of MODEL VHL2G & VHL3G GAS FOOD STEAMERS KEEP THIS MANUAL FOR FUTURE USE GENERAL Vulcan-Hart steamers are produced with quality workmanship and material. Proper installation, usage and maintenance of your steamer will result in many years of satisfactory performance. It is suggested that you thoroughly read this entire manual and carefully follow all of the instructions provided. Models VHL2G & VHL3G steamers feature a gas boiler and manual compartment controls.
INSTALLATION CODES AND STANDARDS In the United States, the steamer must be installed in accordance with: 1) State and local codes; 2) National Fuel Gas Code, ANSI-Z223.1 (latest edition), available from American Gas Association, 1515 Wilson Boulevard, Arlington, VA 22209; 3) NFPA-96, Vapor Removal from Cooking Equipment; and 4) National Electrical Code, NFPA-70 (latest edition), available from National Fire Protection Association, Batterymarch Park, Quincy, MA 02269.
TESTING THE GAS SUPPLY SYSTEM When gas supply pressure exceeds 1⁄2 psig (3.45 kPa), the steamer and its individual shutoff valve must be disconnected from the gas supply piping system. When gas supply pressure is 1⁄2 psig (3.45 kPa) or less, the steamer should be isolated from the gas supply system by closing its individual manual shutoff valve. FLUE CONNECTION DO NOT obstruct the flow of flue gases from the flue located on the rear of the steamer.
PLUMBING CONNECTIONS WARNING: PLUMBING CONNECTIONS MUST COMPLY WITH APPLICABLE SANITARY, SAFETY, AND PLUMBING CODES. Water Supply Connections Two cold water supplies are recommended. Treated water may be required to fill the boiler; untreated water may be used for the cold water condenser on the boiler blowdown line. • Connect cold water supply to the 1⁄2" NPT (1.27 cm) fill water connection. Water treatment may be needed — refer to Water Quality, page 8. Water pressure of 20 – 80 psig is required.
WATER QUALITY Before connecting the steamer to water, the water supply should be analyzed to make sure specifications are met. WATER QUALITY SPECIFICATIONS Total Dissolved Solids (TDS)* Total Alkalinity Silica Chloride pH *17.1 ppm = 1 grain of hardness Less than Less than Less than Less than 7.0 to 8.0 60 20 13 30 ppm ppm ppm ppm If the water supply fails to meet these specifications, it will be necessary to install a water conditioner on the boiler cold water supply line.
4. Observe water level gauge sight glass to verify required water level. • Keep both valves on the water gauge open at all times. 5. Press the reset switch with the green indicator light lit to light the boiler. 6. Both Low Water and High Pressure indicator lights must be off before the burner will ignite. • If the indicator lights do not go off after 15 minutes or if they come on during normal operation, press [ 0 ] on the power switch for off and contact an authorized Vulcan-Hart servicer. 7.
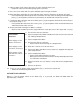
OPERATION WARNING: THE STEAMER AND ITS PARTS ARE HOT. CLEANING, OR SERVICING THE STEAMER. USE CARE WHEN OPERATING, CONTROLS — BOILER (Figs. 1, 2) Power Switch POWER SWITCH HIGH PRESSURE LIGHT • Press [ I ] to begin filling the boiler. • Press [ 0 ] to turn the steamer off (automatic blow down will occur). LOW WATER LIGHT High Pressure Light RESET SWITCH (GREEN) • Is lit after [ I ] is pressed and stays on during fill. Goes off after reset switch is pressed (when green light is lit).
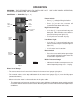
BOILER (Fig. 2) PRESSURE RELIEF VALVE GAS VALVE PROBE HOUSING BLOWDOWN VALVE WATER INLET VALVE MANUAL VALVES WATER LEVEL GAUGE Fig. 2 PL-41514-1 Pressure Relief Valve • The pressure relief valve located on the top left side prevents pressure in the boiler from exceeding 15 psig. • Manually pull up the lever daily to reduce scale buildup and verify that the pressure relief valve functions properly. Gas Valve • Located behind the door. Turn counterclockwise to on; clockwise to off.
MANUAL COMPARTMENT CONTROLS (Fig. 3) STEAM CONTROL HANDLE Door Latch • DOOR LATCH Holds door closed. Door Screw Handle (not shown) • Seals door gasket against cabinet. Steam Control Handle • Pull out and down to open steam valve. • Push up and back to turn steam valve off. Cooking Time Control COOKING TIME CONTROL PL-41519-1 Fig. 3 • Sets the desired cooking time (0 – 60 minutes). • At end of cooking cycle, buzzer sounds for a short interval and then stops.
AUTOMATIC COMPARTMENT CONTROLS (Fig. 4) Optional Door Latch STEAM CONTROL HANDLE • Holds door closed. Door Screw Handle (not shown) • Seals door gasket against cabinet. DOOR LATCH Steam Control Handle • Pull out and down to open steam valve. • Push up and back to turn steam valve off. Cooking Time Control • Sets the desired cooking time (0 – 60 minutes). Compartment Switch COOKING TIME CONTROL COMPARTMENT SWITCH PL-41445-1 Fig. 4 • Press top of switch to start the timer.
PRE-VENTTM AUTOMATIC COMPARTMENT CONTROLS (Fig. 5) Optional TEMPERATURE SENSOR DOOR LATCH STEAM CONTROL HANDLE COOKING TIME CONTROL COMPARTMENT SWITCH Fig. 5 PL-41520-1 Door Latch • Holds door closed. Door Screw Handle (not shown) • Seals door gasket against cabinet. Steam Control Handle • Pull out and down to open steam valve. • Push up and back to turn steam valve off. Cooking Time Control • Sets the desired cooking time (0 – 60 minutes). Compartment Switch • Press top of switch to start the timer.
SELECTION OF PANS FOR STEAM COOKING Vulcan Apapt-A-PanTM steamer compartments are designed to accept combinations of the following perforated or solid cooking pans (Fig. 6). Maximum Quantity Depth of Pan (4) 12" x 20" (30 cm x 51 cm) 6" (15 cm) (6) 12" x 20" (30 cm x 51 cm) 4" (10 cm) (8) 12" x 20" (30 cm x 51 cm) 2 1/ 2" (6 cm) (6) 18" x 26" (46 cm x 66 cm) (After removal of center support) 1" (2.
The following chart lists the type of pan to use for various foods: FRESH PRODUCT TYPE PAN Solid 12" x 20" (30 x 51 cm) Perforated 12" x 20" (30 x 51 cm) 18" x 26" (46 x 66 cm) PRODUCT EXAMPLES Dehydrated Fruits and Vegetables Dried peaches, prunes, apples, and apricots. Sliced onions and sliced potatoes. Cereals and Puddings Cream of wheat, rolled oats, rice.
CLEANING Cooking Compartment Drains Keep compartment drains running freely. Inspect compartment drains daily for blockage. Remove any particles or debris from the perforated strainer daily or more often if needed. After cooking greasy foods, close the doors and operate each compartment for 15 – 30 minutes to flush any residual grease and oils down the compartment drain. Pour one-half gallon (2 liter) of warm soapy water down the drain and rinse with one-half gallon (2 liter) of hot clear water.
GUIDELINES FOR MAINTAINING STAINLESS STEEL SURFACES There are three things that can breakdown stainless steel and allow corrosion to develop: 1) Abrasion; 2) Deposits and water; and 3) Chlorides. Avoid rubbing with steel pads, wire brushes, or scrapers that can leave iron deposits on stainless steel; instead, use plastic scouring pads or soft cloths. For stubborn stains, use products such as Cameo, Talc, or Zud First Impression. Always rub parallel to the polish lines or with the grain.
SCALE RELATED MAINTENANCE Periodic maintenance is necessary to keep your boiler clean and efficient. It is recommended that initially after three months of steamer usage you have your Vulcan Hart authorized servicer inspect the boiler and perform the below listed maintenance and inspections. Local water conditions and steamer usage will determine the frequency that this service must be repeated; however, a minimum recommendation is once a year. This maintenance is not covered by warranty.
TROUBLESHOOTING PROBLEM POSSIBLE CAUSE POSSIBLE REMEDY Boiler will not fill. Boiler's power and water supply are off. Check that power and water supply are on. Boiler will not heat or build pressure. Gas supply is off. Check that gas supply is on. Refer to Start-Up Test Run, pages 8 – 9.