
Specifications

-
5 -
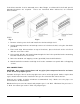
If the Cheesemelter is to be mounted over a Gas Range, a reinforced hi-shelf and special
mounting brackets are required. These are furnished when ordered as an elevated
Cheesemelter.
Fig. 1 Fig. 2 Fig. 3
1. Remove existing rear shelf and install the reinforced high shelf.
2. Install mounting brackets on both top corners of reinforced shelf, using the four bolts
provided.
3. Place and align Cheesemelter on top of brackets; place the back of the unit flush
with the rear of the shelf.
4. Using a #19 drill bit, drill from below through the four holes provided on the mounting
bracket into the base of the unit.
5. Drive four #10-24 self-tapping screws (provided) into the drilled holes.
6. Attach both Cheesemelter and high shelf to the common rear panel with self-tapping
screws.
GAS CONNECTIONS
CAUTION: Gas supply connections and any pipe joint compound must be resistant
to the action of propane gases.
Location of the gas inlet is at the top right rear corner of the top panel. Codes require that
a gas shutoff valve must be installed in the gas line ahead of the Cheesemelter.
Connect gas supply (1/2“pipe minimum recommended size). Make sure the pipes are
clean and free of obstructions.
Maximum line pressure for natural and propane gas is 14" W.C. Minimum line pressure is
7" W.C. for natural gas and 11" W.C. for propane gas.