
Service manual
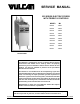


ER SERIES ELECTRIC FRYERS - REMOVAL AND REPLACEMENT OF PARTS
F35613 (September 2003)
Page 9 of 48
A. Lift the upper cover over support rods to
remove.
4. Remove screws securing lower cover to motor
mounting base.
5. Reverse procedure to install.
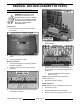
Rear Door (Access Cover)
1. Access rear of fryer.
2. Remove basket lift covers if basket lift option is
installed.
3. Remove access cover at the top.
NOTE: The cover is flanged at the top & bottom and
is held in place by an interference fit. The bottom
flange is formed to secure the cover to fryer.
4. Reverse procedure to install.
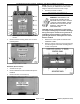
COOKING CONTROLS
WARNING: DISCONNECT THE
ELECTRICAL POWER TO THE
MACHINE AND FOLLOW LOCKOUT
/ TAGOUT PROCEDURES. THERE
MAY BE MULTIPLE CIRCUITS. BE
SURE ALL CIRCUITS ARE
DISCONNECTED.
CAUTION: Certain components in this system
are subject to damage by electrostatic discharge
during field repairs. A field service ground kit is
available to prevent damage. The field service
grounding kit must be used anytime the control
board is handled.
1. Remove the control panel as outlined under
CONTROL PANEL.
2. Remove cooking control by removing mounting
nuts securing the control and mounting panel
to front control panel.