
Hardware manual


10 ASA-72 Hardware Manual
© 2008 Apollo Security Inc.
3 System Wiring
NOTE
—
Use tie-wraps (supplied) to provides strain relief for all wiring.
3.1 Power
Route the input voltage wiring through any one of the four knockouts provided in the enclosure.
Snap-off the protective terminal block cover (where applicable) and connect to the terminal block
as shown in Figure 59. Connect the +5V and + RETURN wires to the terminal block and replace
the cover.
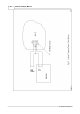
Connect a UPS as shown in Figure 60.
3.2 RS-485 Communication Line
The ASA-72 is equipped with an RS-485 interface. It communicates with other devices with
RS-485 interface in a multi-dropped configuration. The main RS-485 run (4000 feet max.) must
use low capacitance shielded cable with 2 twisted pairs having a characteristic impedance of 120
Ohms (Belden 9842 or equivalent). Carefully insulate the shield drain wire (SG) with sleeving for
a reliable installation.
Line terminators (ATM-48, P/N 470-030) must be installed at the ends of the communication lines
for reliable data transmission .
Route the RS-485 cable into the enclosure through a suitable knockout and connect the RS-485
communication lines as indicated in Figure 58.
3.3 General Alarm Inputs
The ASA-72 provides two general alarm inputs. The wiring to the input should be made with
twisted pair 24 AWG wire. If these input is not used, it should be ‘jumpered’ using a 1” (25 mm)
long piece of wire connecting the two terminals to form a closed circuit. This will prevent an alarm
condition being reported to the host.
3.3.1 Cabinet Tamper
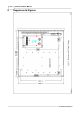
The cabinet tamper switch is pre-wired as shown in Figure 57.
3.3.2 Power Fault Input
Power fault is sensed when the ASA-72 system is powered from a UPS. Route the wires (24
AWG or larger) through a convenient knockout and terminate them as shown in Figure 57.
3.3.3 Keyswitch/ACK Switch Wiring (Optional)
Two ACK push button wiring options, using a customer-supplied keyswitch, are shown in Figure
62.
The auto-acknowledge wiring option supplies the switch closure from the keyswitch, rather than
from the ACK push button, thereby providing a permanent acknowledgement.
The enable/disable option provides secure control of the ACK push button.